This tutorial will guide you through installing Game of Active Directories (GOAD) on Proxmox.
An additional challenge can be added: attempting to escape detection from Trapster, our open source honeypot solution. The code is available here: https://github.com/0xBallpoint/trapster-community
This guide is heavily inspired by two excellent tutorials made by 0xBEN and Mayfly:
We followed these tutorials to get started, but encountered some compatibility issues. That's why we decided to create a tutorial to explain our steps.
Proxmox Configuration
This tutorial starts after you have created your server and successfully installed Proxmox.
Log in to Proxmox and make sure to change your password. Then, you can connect to your server via SSH using ssh root@<your_ip>
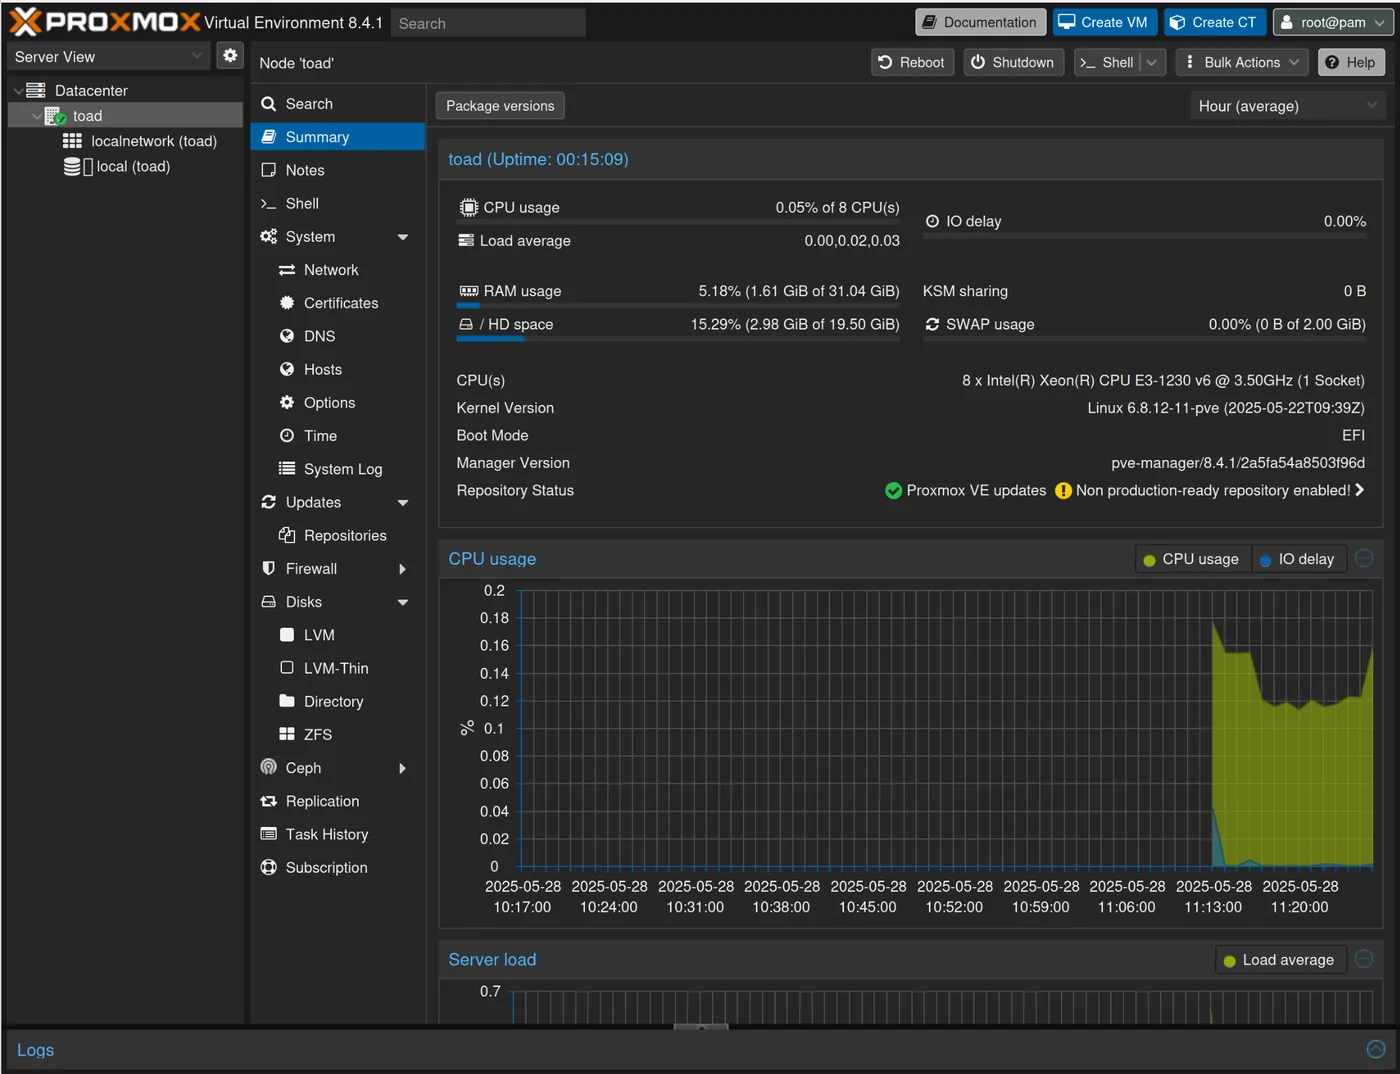
We arrive at our Proxmox dashboard. I named my node "toad", for Trapster + GOAD, but you can put whatever name you want:
Network
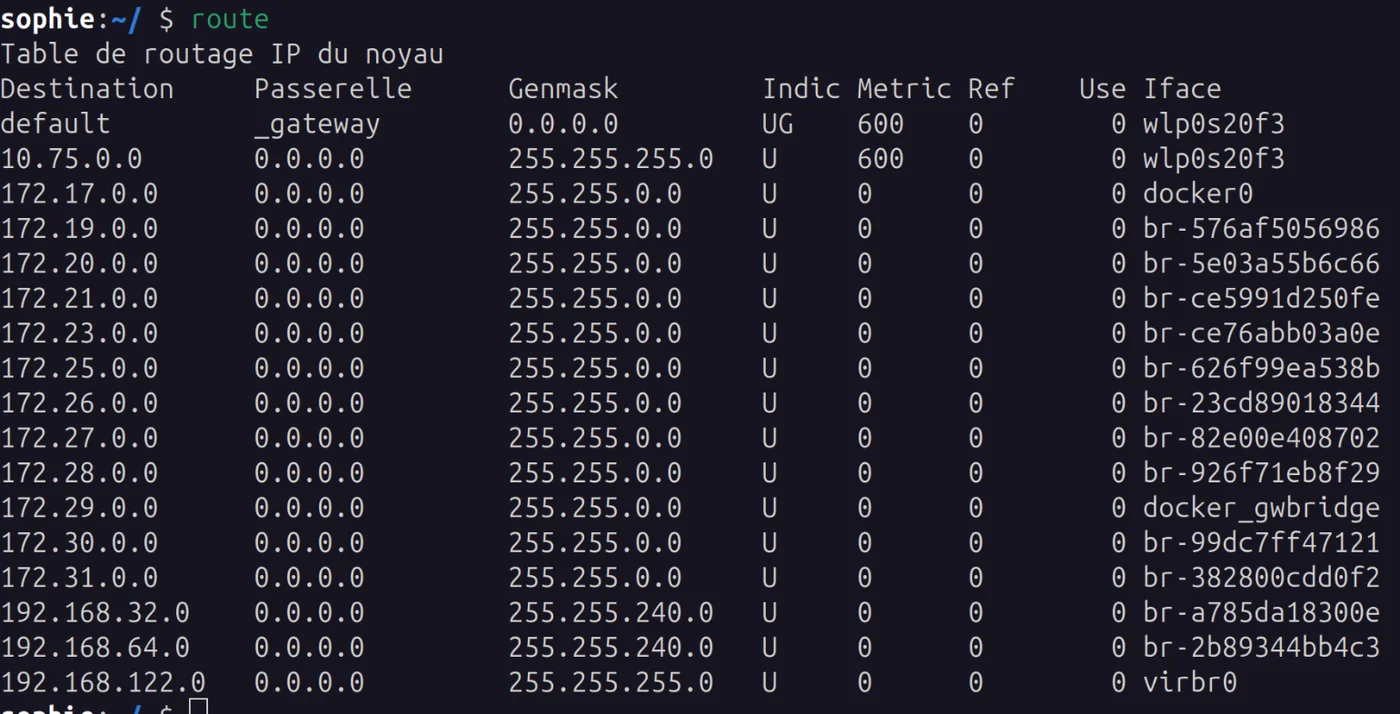
Before starting to configure the network, let's check that there won't be any IP conflicts with the lab network we're going to build. Specifically, that there are no existing routes leading to 192.168.10.0 which will be our GOAD network.
Use the route command to verify that there's nothing else already on 192.168.10.0. If there is, you may need to change the 192.168.10.0/24 domain in the following steps to avoid problems later. In that case, simply replace 192.168.10.0 with a subnet like 192.168.30.0/24 for all future steps.
Create the Network
We will follow the same network configuration as explained in MayFly's tutorial for Proxmox:
- Wan: 10.0.0.0/30 (10.0.0.1-10.0.0.2) - Proxmox Host + pfSense
- Lan Network: 192.168.1.1/24 (192.168.1.1-192.168.1.254) - this will be the LAN network for pfSense and the provisioning machine
- VLAN1: 192.168.10.1/24 (192.168.10.1-192.168.10.254) - our GOAD network
- VLAN2: 192.168.20.1/24 (192.168.20.1-192.168.20.254) - not used in this lab but we'll configure it in case you want to go further with GOAD
- OpenVPN: 10.10.10.0/24 (10.10.10.0-10.10.10.254) - to connect to the lab
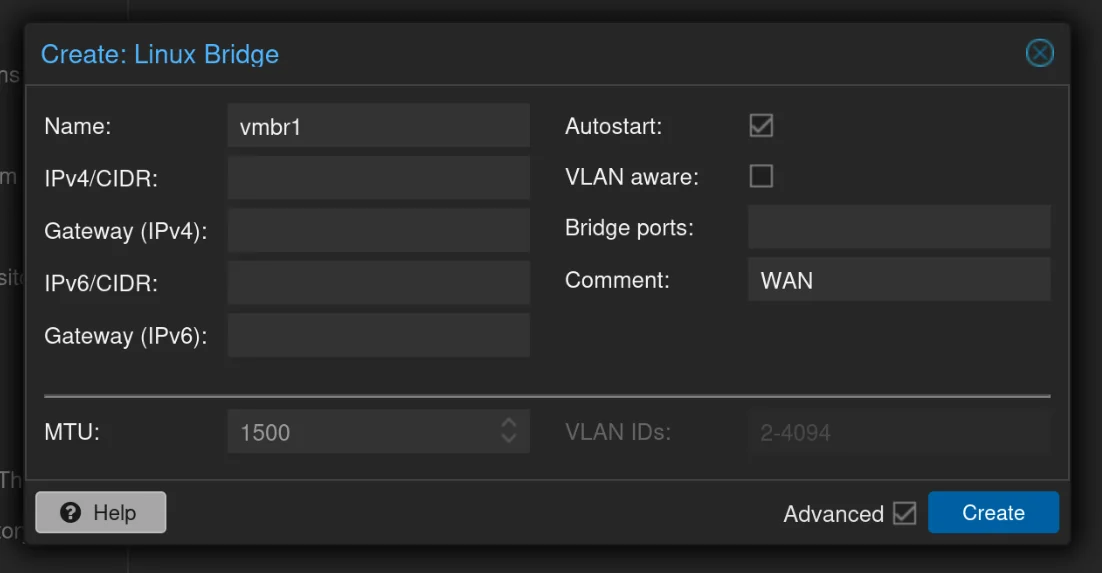
To create the bridges:
- Go to your Proxmox dashboard
- Click on your Node (toad)
- Network > Create > Linux Bridge
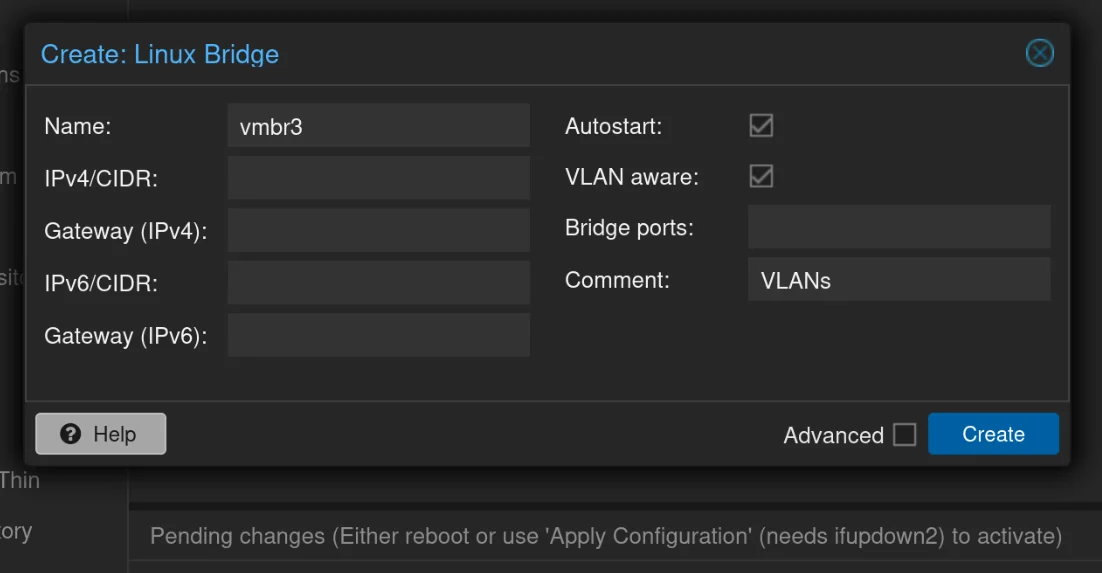
- Create 3 Linux Bridges following the given examples
vmbr1: WAN
vmbr2: LAN

vmbr3: vlans – Make sure to set VLAN Aware
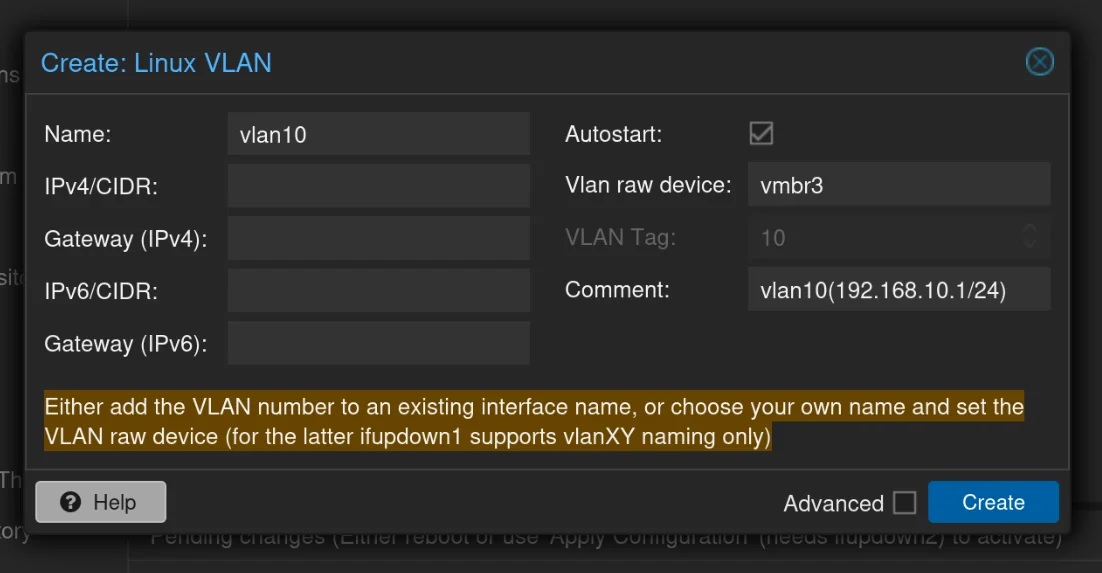
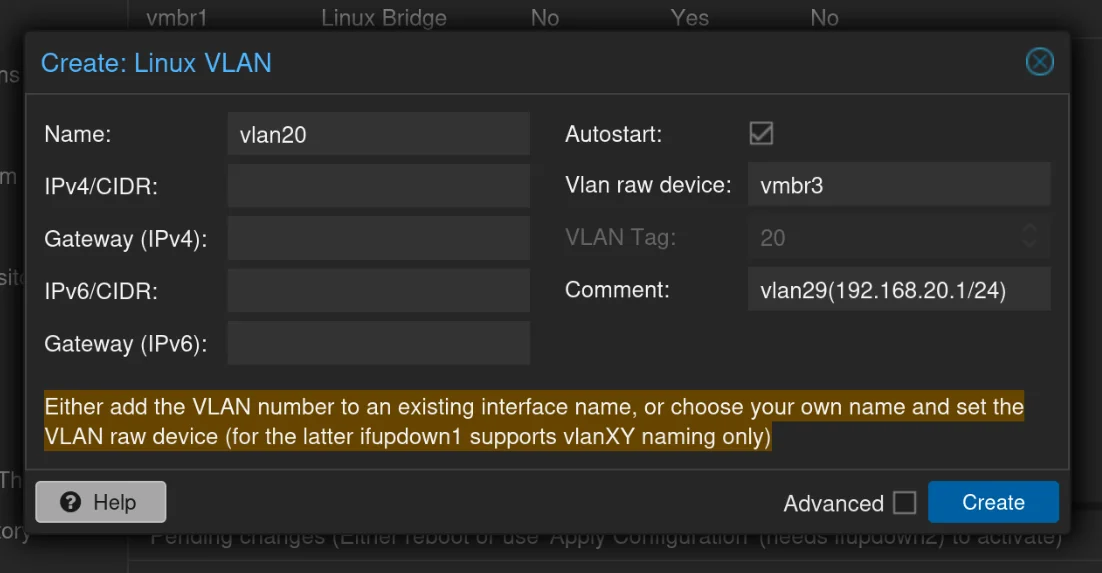
Create the two VLANs
Now, create two Linux VLANs following these examples:
vlan10: The Vlan Raw Device is vmbr3, this will be for the 192.168.10.1/24 network
vlan20: The Vlan Raw Device is vmbr3
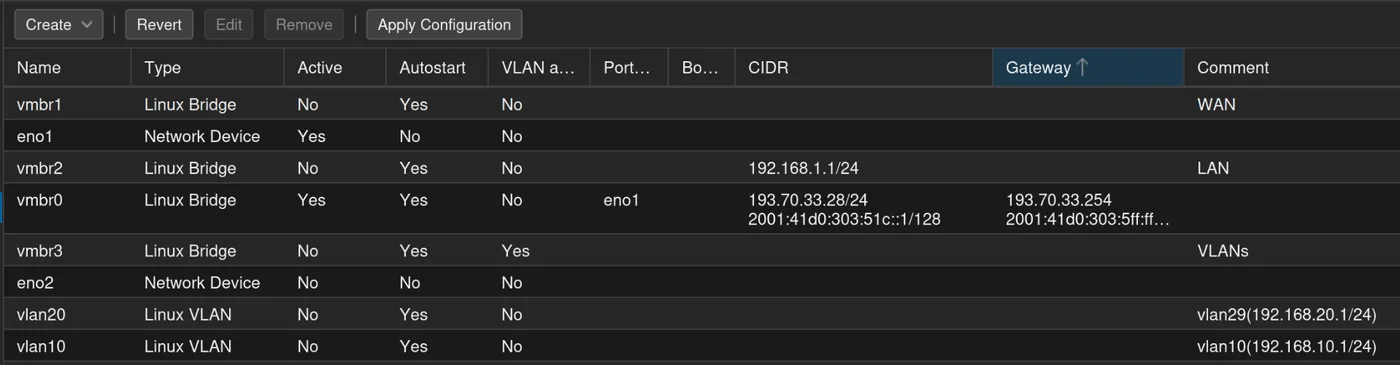
Then, apply the Configuration, and you should get this:
pfSense Installation
In this section of the tutorial, we will configure pfSense which will serve as a Firewall and Router between our lab networks.
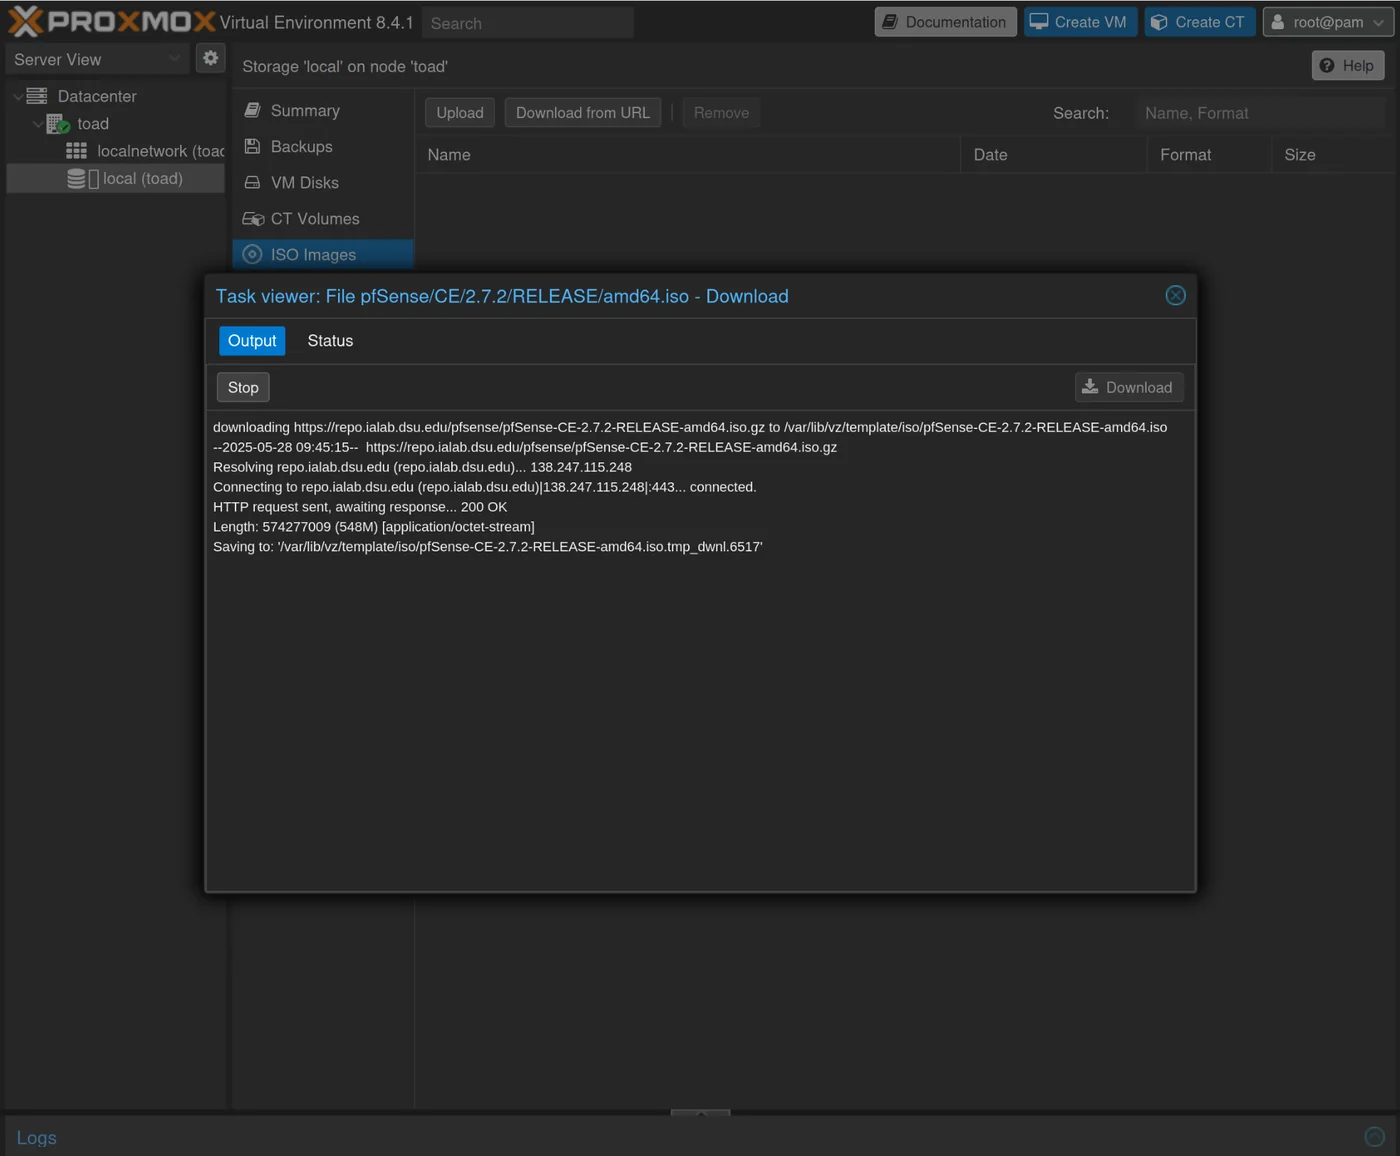
We can download pfSense directly to our machine via the Proxmox interface. You can find the link to the latest version of pfSense here: https://repo.ialab.dsu.edu/pfsense/
Find the most recent version, for me it's pfSense-CE-2.7.1-RELEASE-amd64.iso.gz, and copy the download link.
 Go to
Go to Local -> ISO Images -> Download from URL and paste this URL
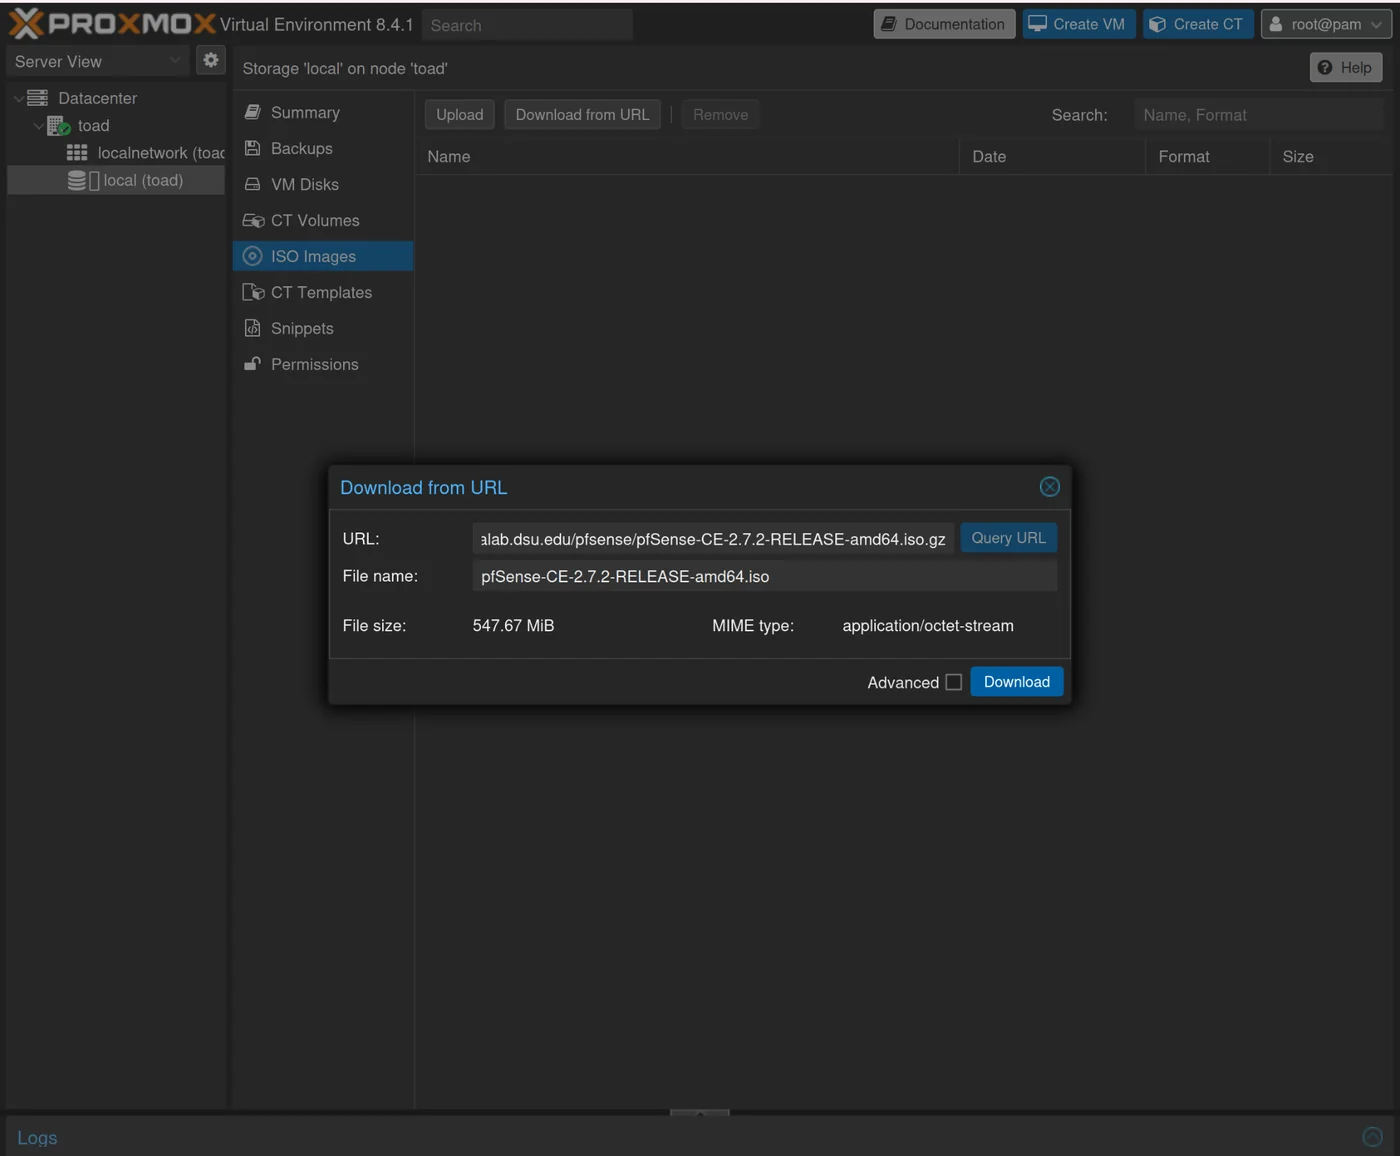
Wait for the download:
Create a virtual machine for pfSense
Go to Create VM in the upper right corner of proxmox, then select the ISO image we just downloaded for pfSense
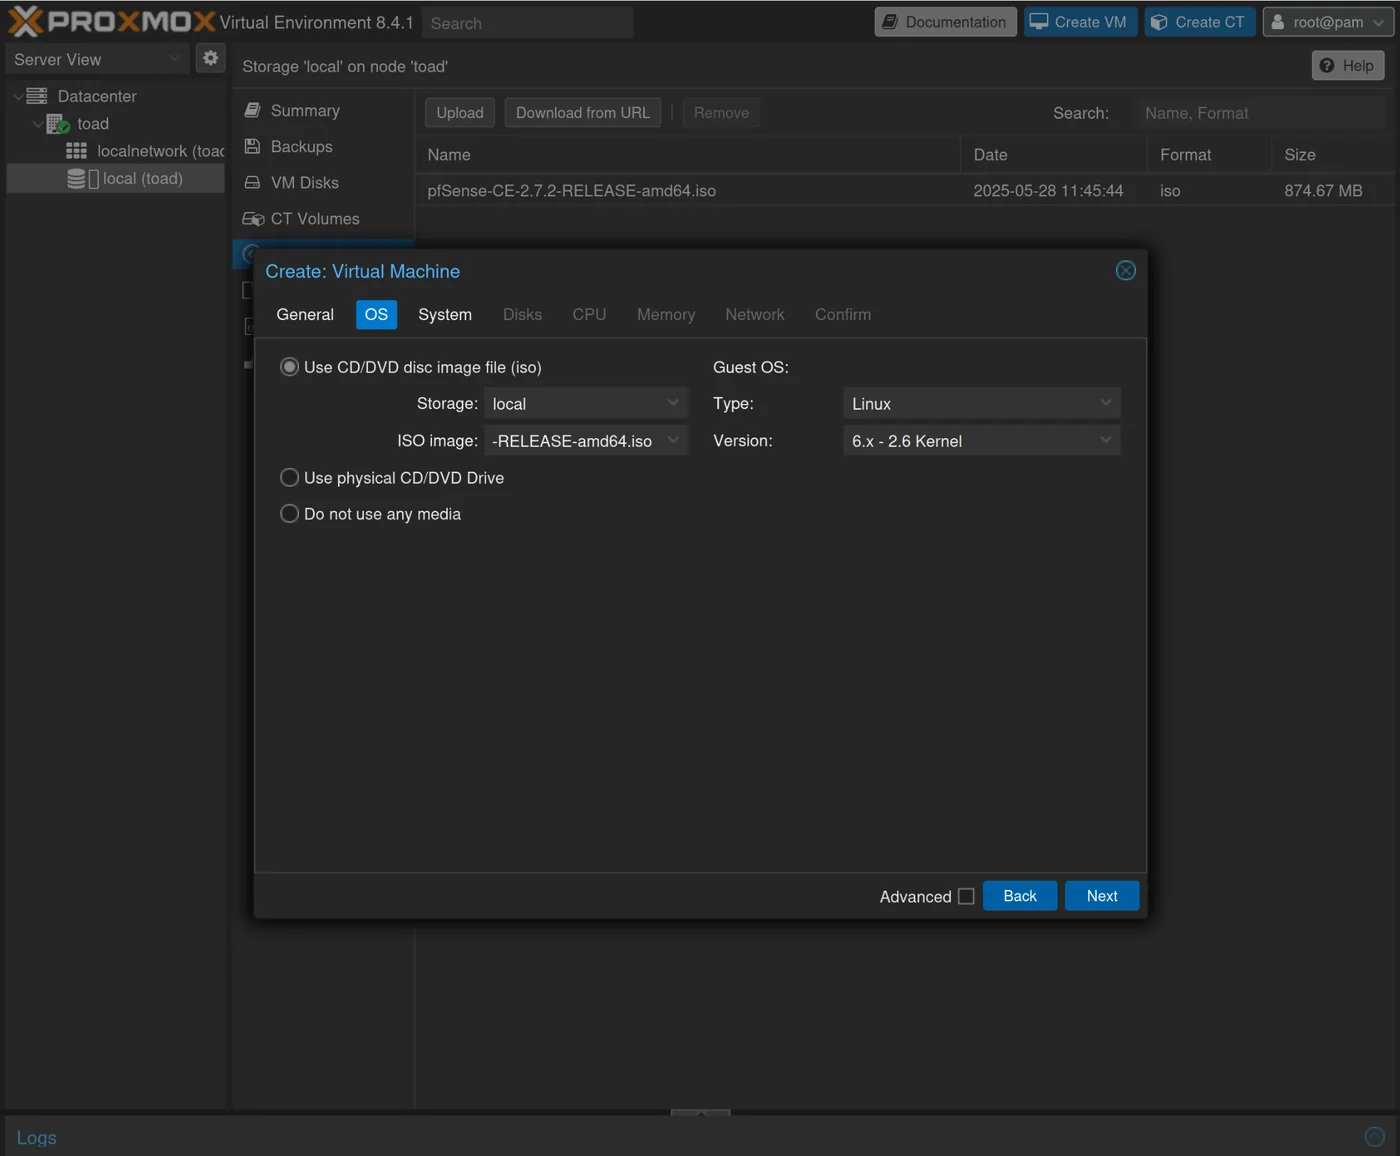
Set:
- 4096 for RAM
- 2 CPU
- Add the vmbr1 bridge for the network
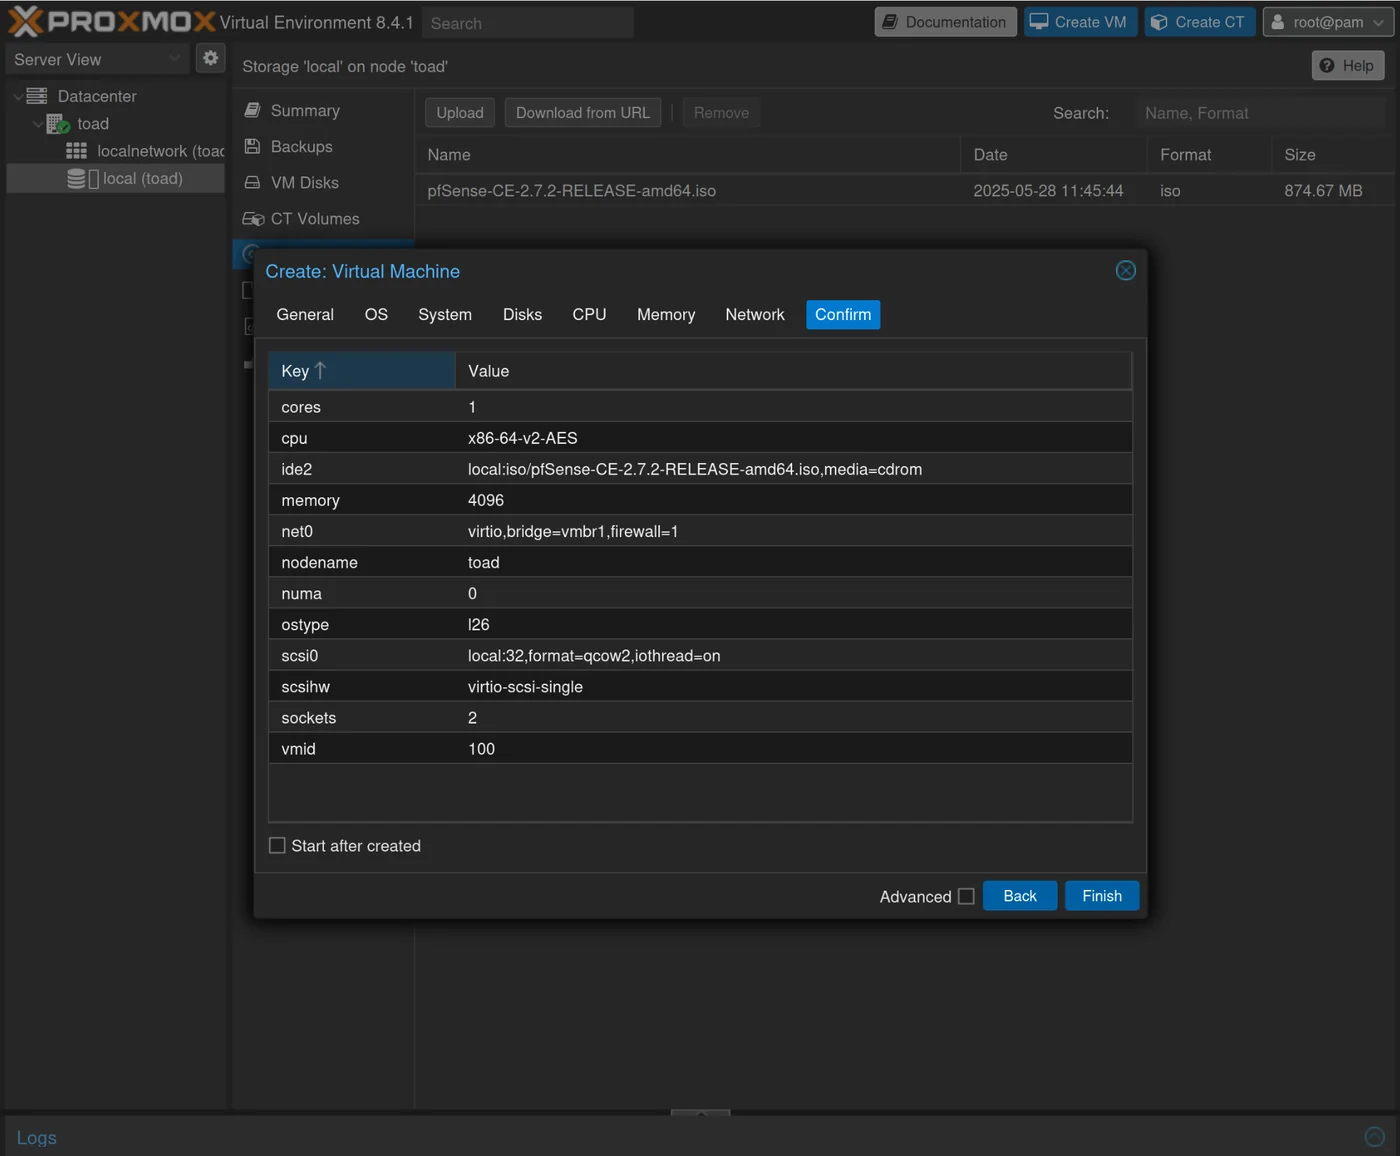
After creation, we will give access to the other two bridges so that pfSense is connected to all our networks and allows routing between them.
Click on the created VM -> Hardware -> Add -> Network Device and select vmbr2 for the bridge

Repeat for vmbr3 to finally have vmbr1, vmbr2, vmbr3 all connected as network devices
Install pfSense
Once the VM is created, we can start it and follow the pfSense installation process: I followed the Guided Root-on-ZFS
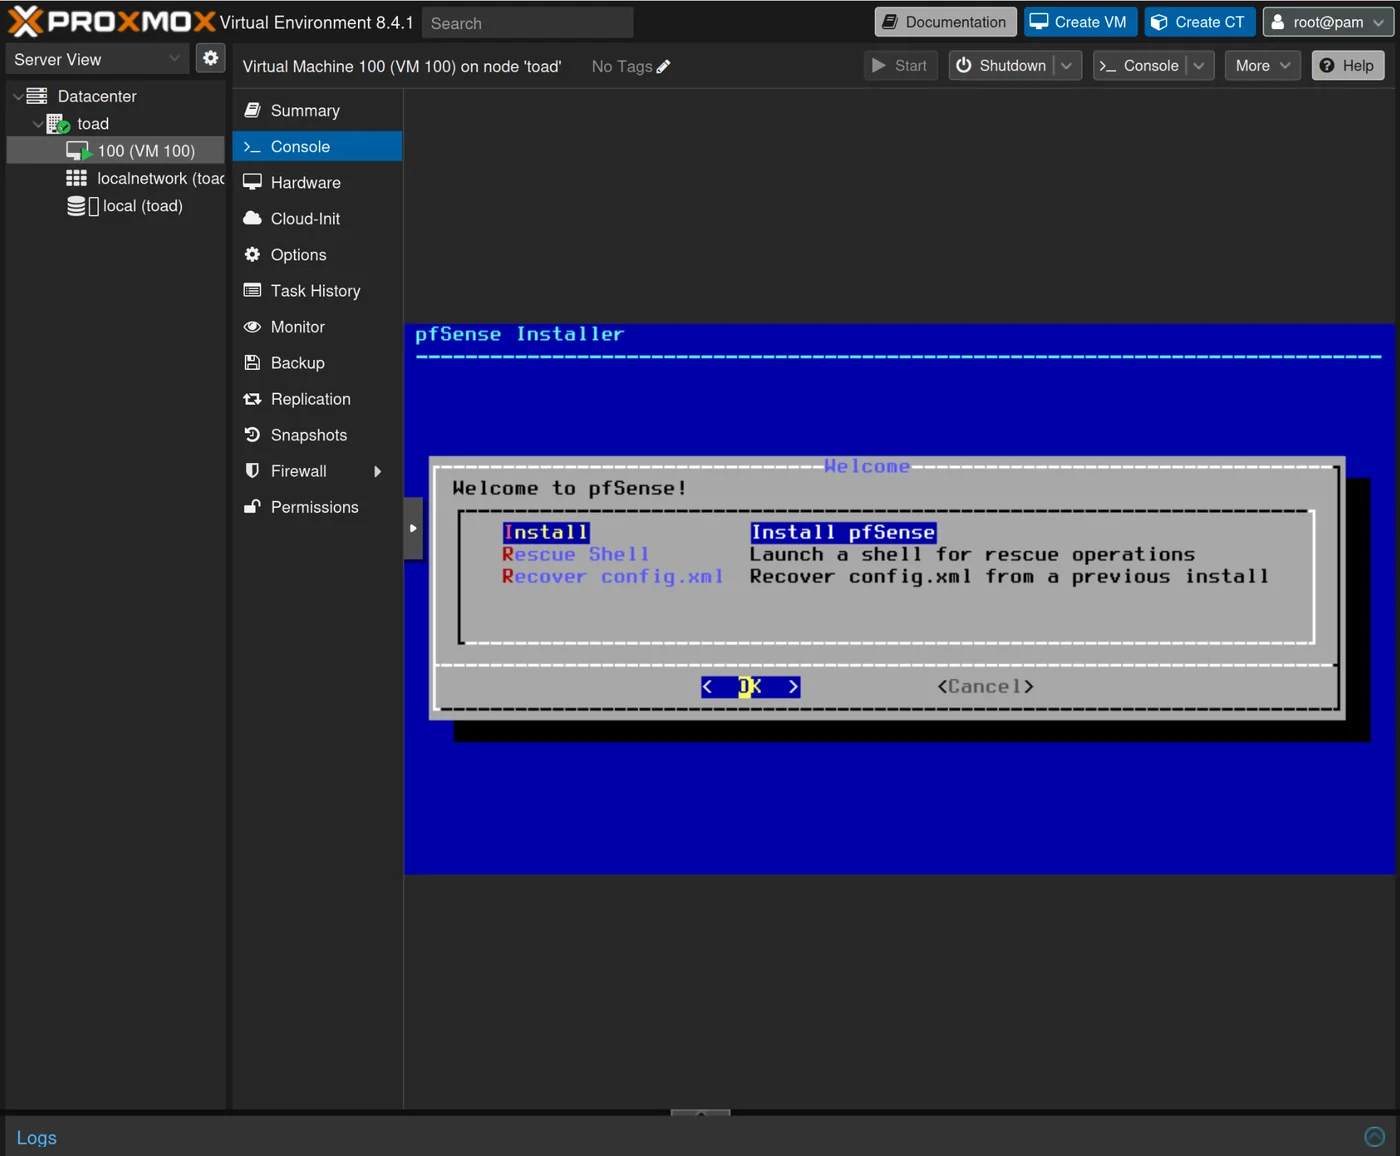
I chose stripe for the disks then rebooted into the installed system once finished.
pfSense Configuration
From the pfSense console, we can configure the interfaces.
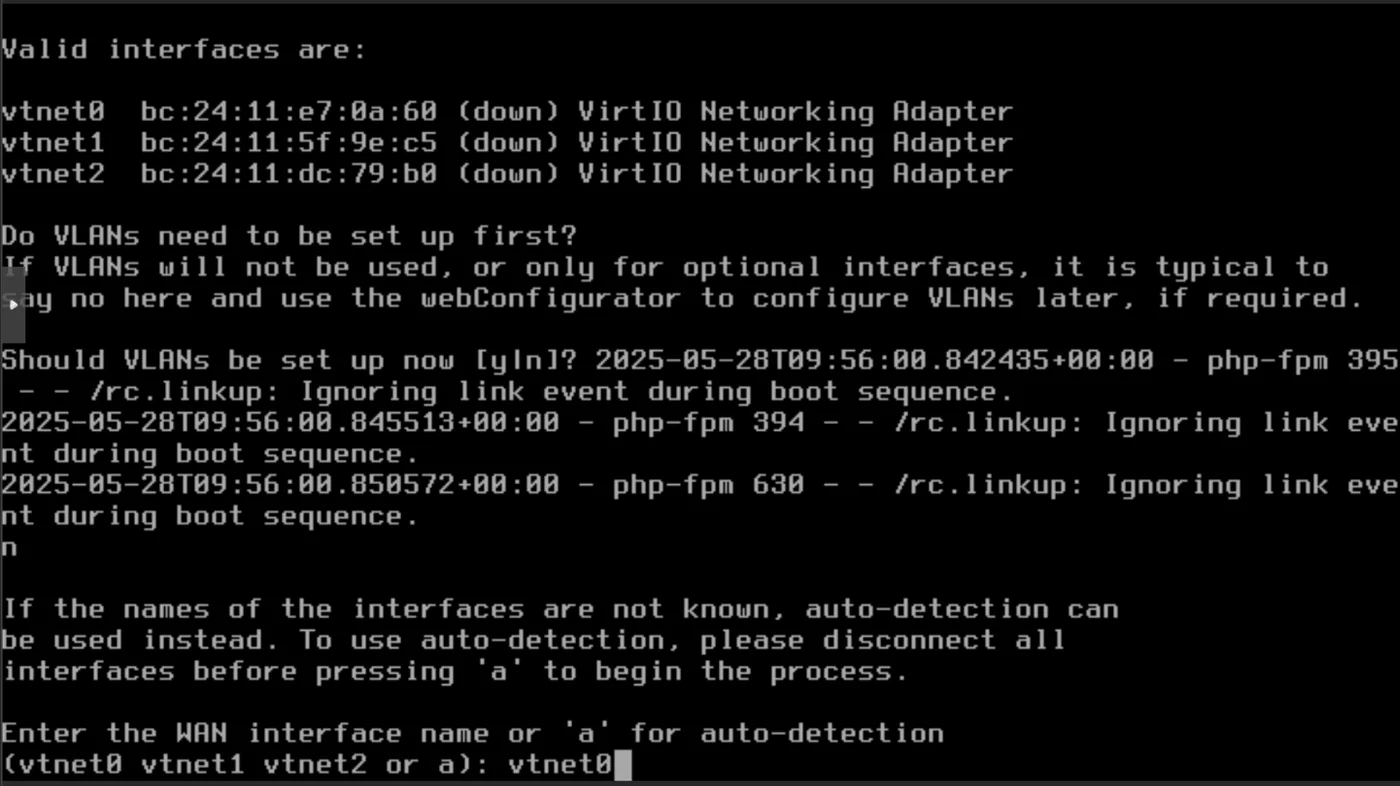
When prompted:
- Should VLANs be set up now [y|n]: n
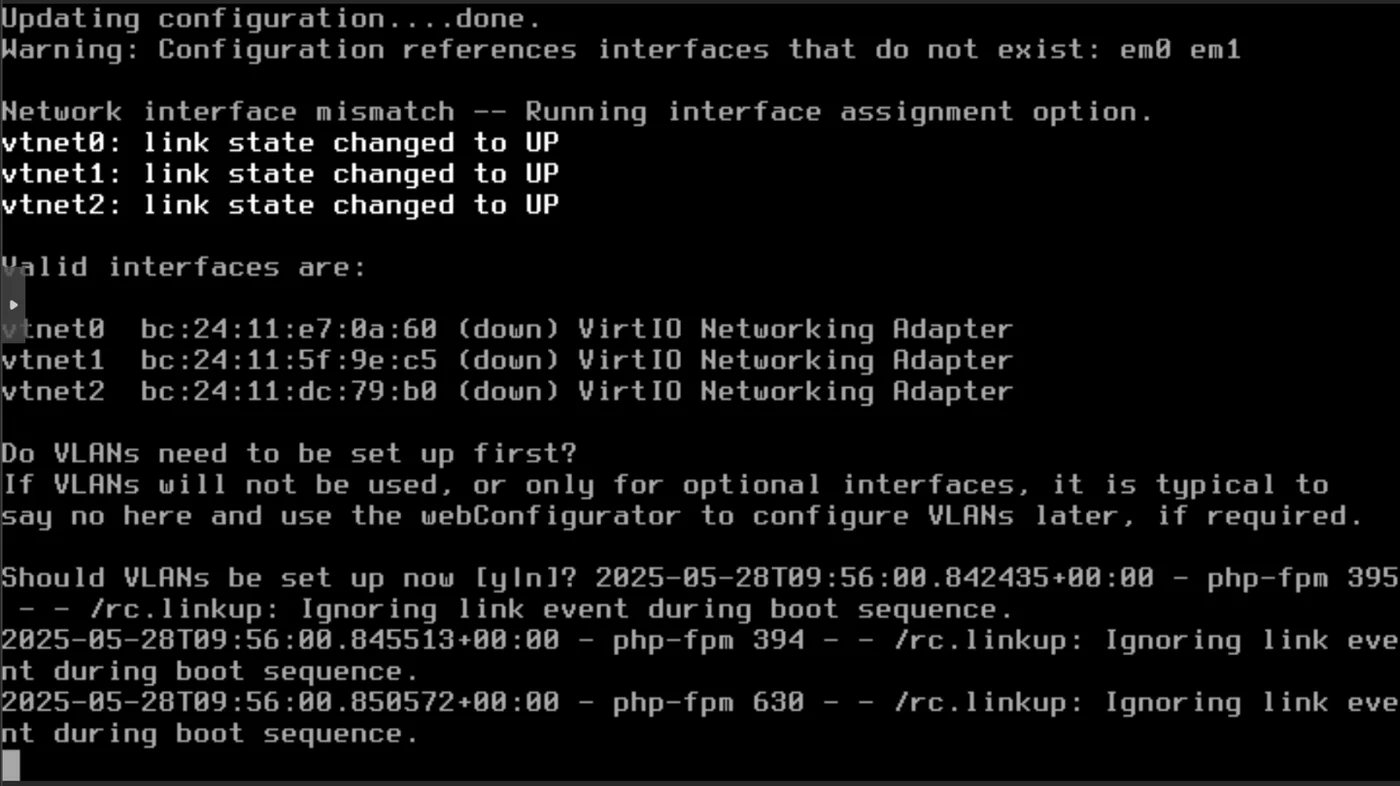
When prompted:
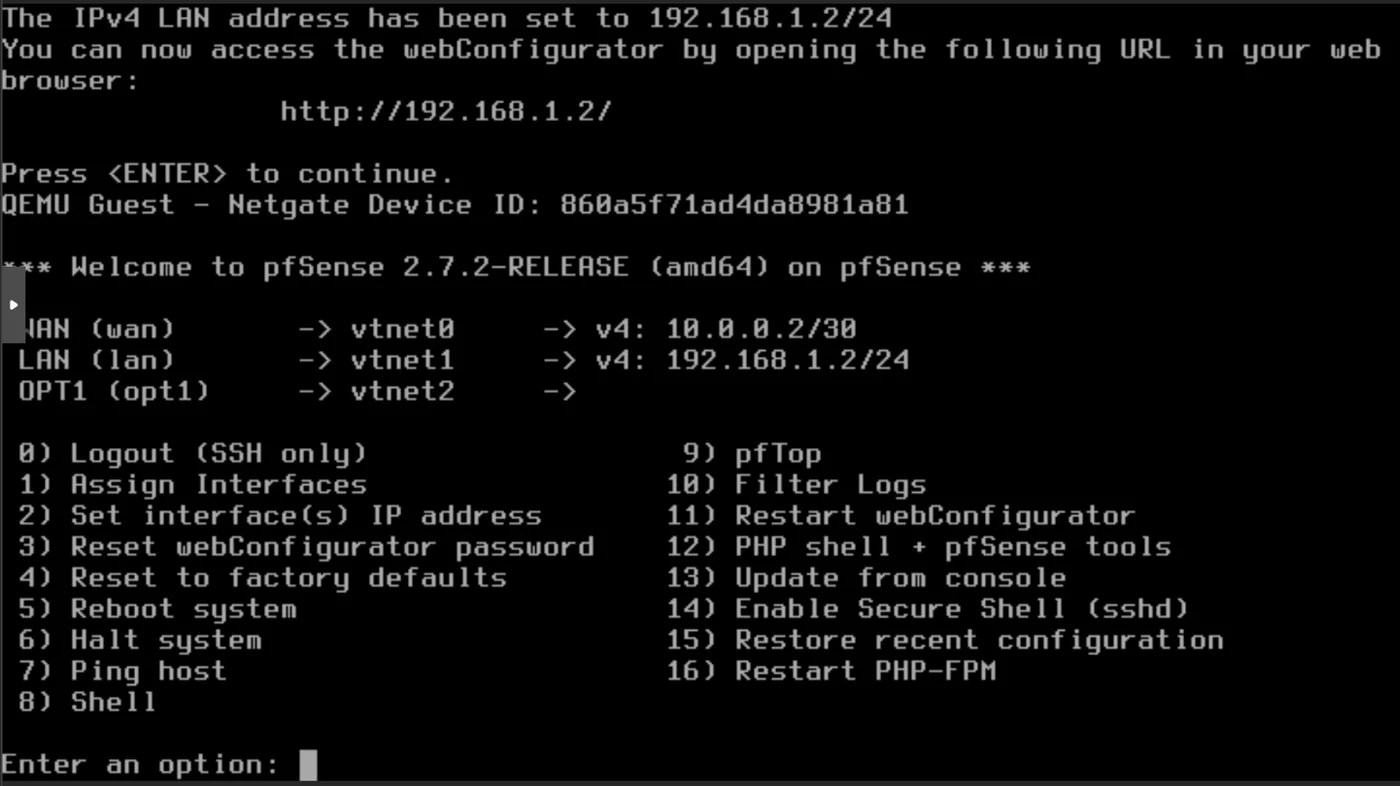
- for the WAN interface: vtnet0
- for the LAN interface: vtnet1
- for the OPT1 interface: vtnet2
Then answer yes to continue and the interface configuration should start
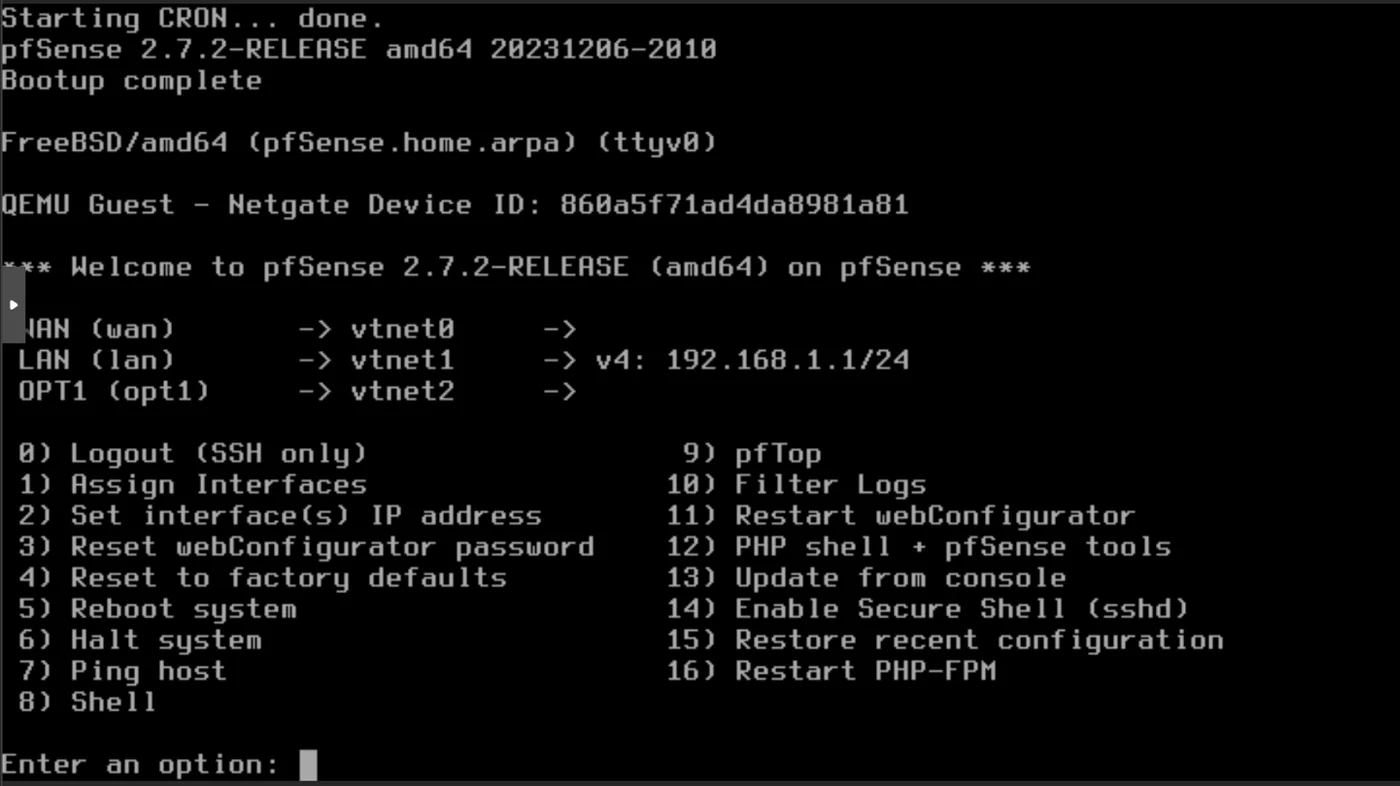
Once you reach the Welcome to pfSense section, select option 2) Set interface(s) IP address in the pfSense terminal
Start by configuring WAN: 1
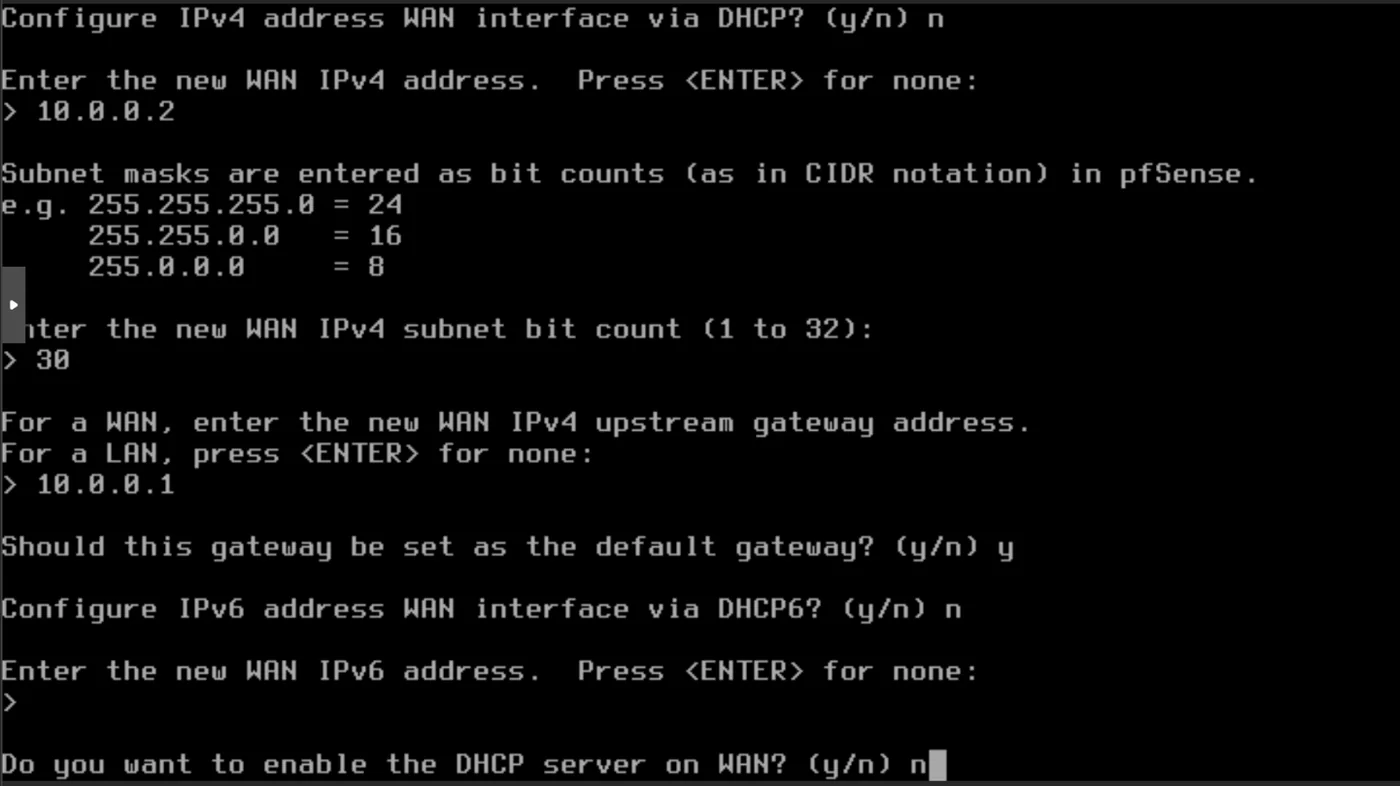
- Configure IPv4 address WAN interface via DHCP? n
- Enter the new WAN IPv4 address: 10.0.0.2
- Give the subnet bit count: 30
- Set the new WAN IPv4 upstream gateway address: 10.0.0.1
- Should this gateway be set as the default gateway? n
- Configure IPv6 address WAN interface via DHCP6? n
- Enter the new WAN IPv6 address: \ to give none: \
- Do you want to enable the DHCP server on WAN? n
- Do you want to revert to HTTP as the webConfigurator protocol? y
Now we can configure LAN
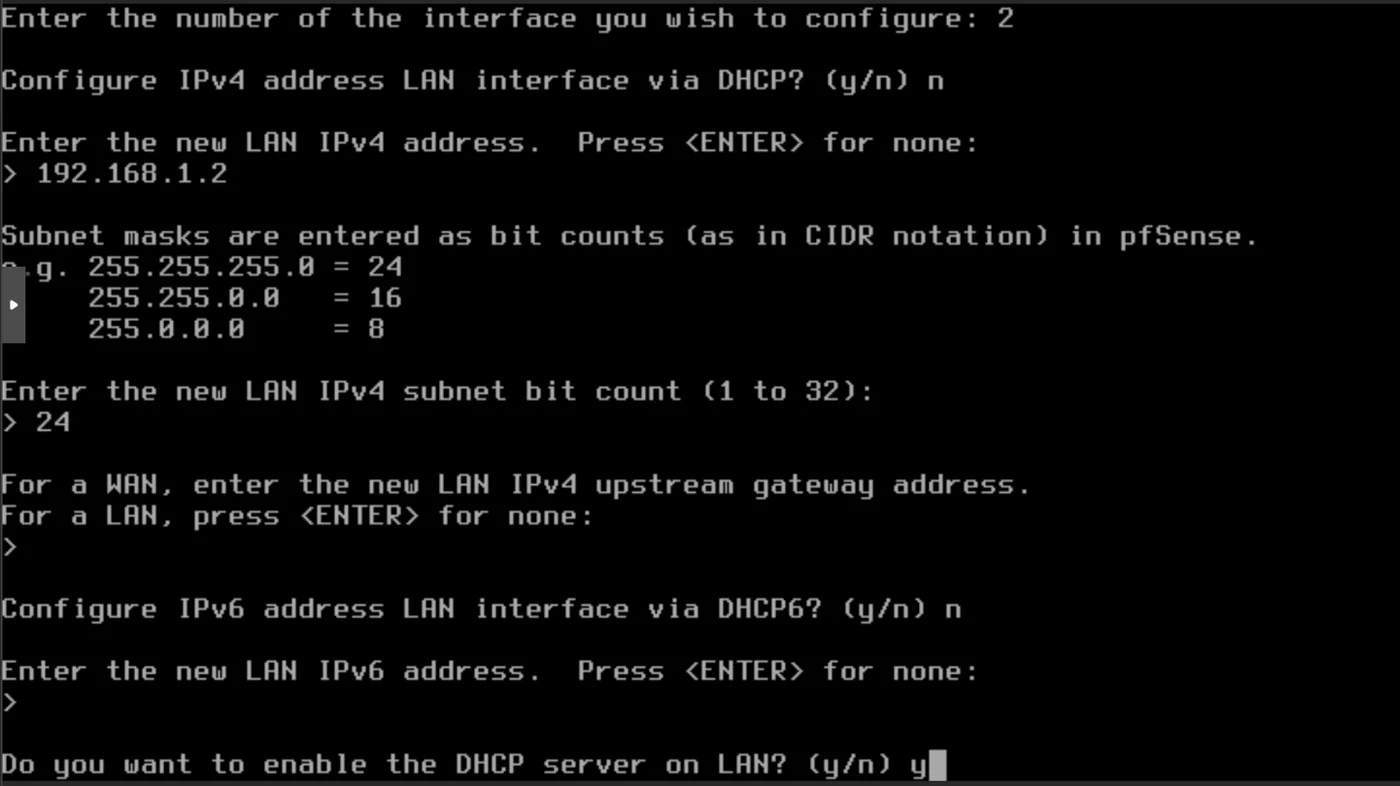
- Configure IPv4 address LAN interface via DHCP: n
- Enter the new LAN IPv4 address: 192.168.1.2
- Enter the new LAN IPv4 subnet bit count: 24
- For a WAN, enter the new LAN IPv4 upstream gateway address. For a LAN, press \ for none: \
- Configure IPv6 address LAN interface via DHCP6? n
- Enter the new LAN IPv6 address. Press \ for none: \
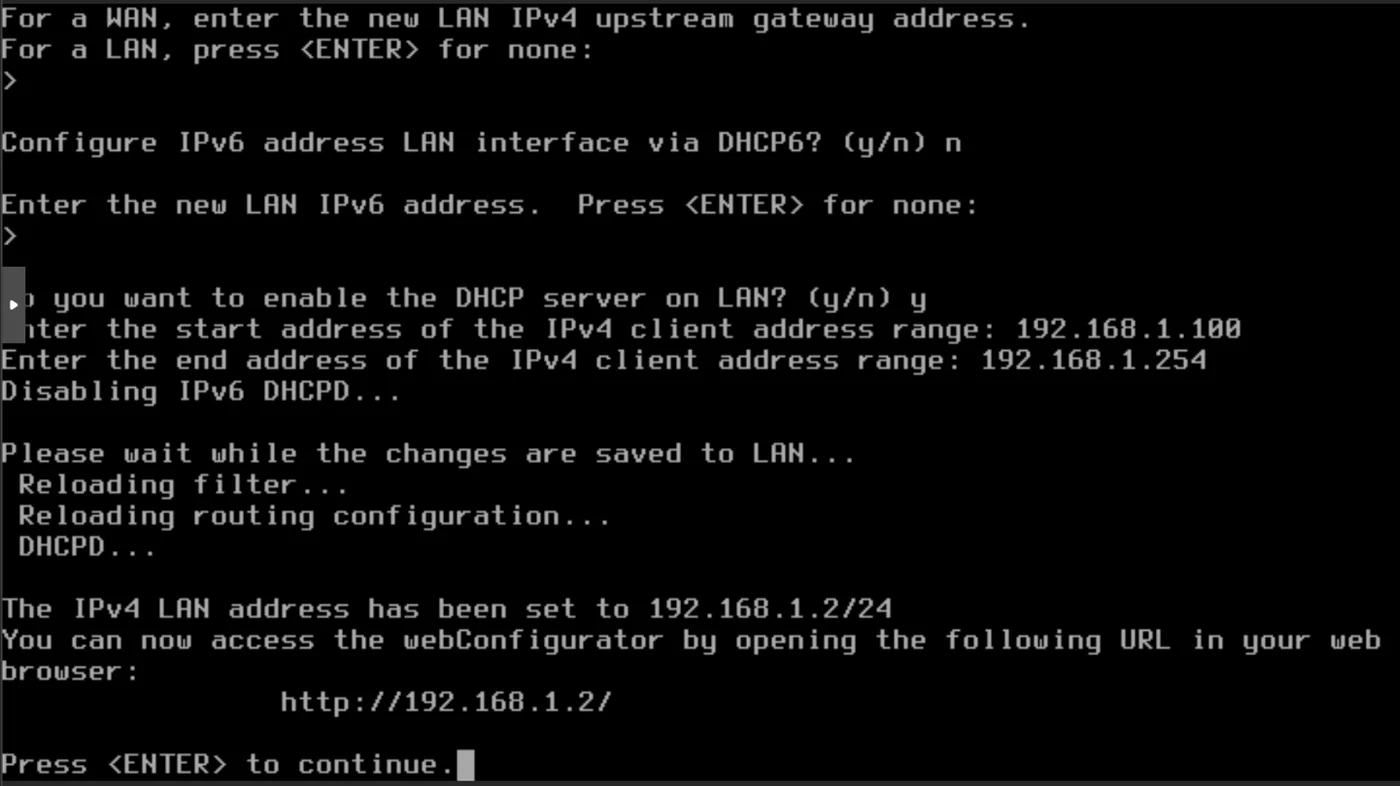
- Do you want to enable the DHCP server on LAN? y
- Enter the start address of the IPv4 client address range: 192.168.1.100
- Enter the end address of the IPv4 client address range: 192.168.1.254
We are notified that we can now access the pfSense webConfigurator at http://192.168.1.2
We redirect access to http://192.168.1.2 to modify via the pfSense web interface. We haven't configured the provisioning VM yet but we can already create the ssh shortcut
Edit ~/.ssh/config to add the following:
Host goadproxmox
    User root
    Hostname XXX.XXX.XXX.XXX
    Port 22
    IdentityFile ~/.ssh/id_rsa_goad
    LocalForward 8082 192.168.1.2:80

Host goadprovisioning
    User root
    Hostname 192.168.1.3
    Port 22
    IdentityFile ~/.ssh/id_rsa_goad
    Proxyjump goadproxmox
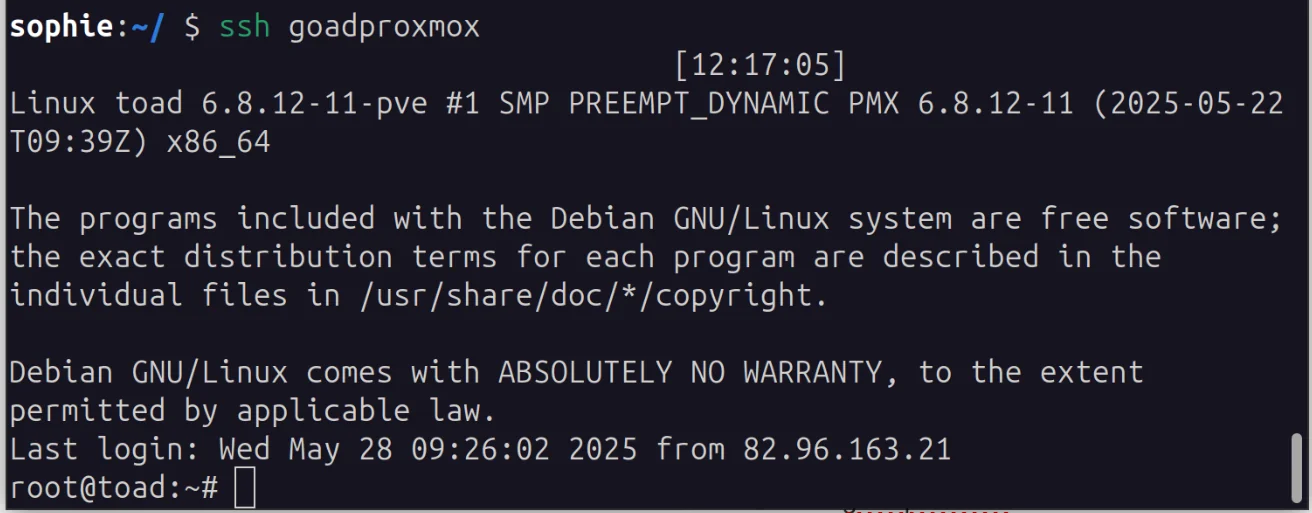
With your provisioning machine started and online we can now run ssh goadproxmox and you can connect to http://127.0.0.1:8082/
pfSense Wizard Configuration
We are working on the pfSense homepage that we linked using ssh goadproxmox. Your page should be at http://127.0.0.1:8082
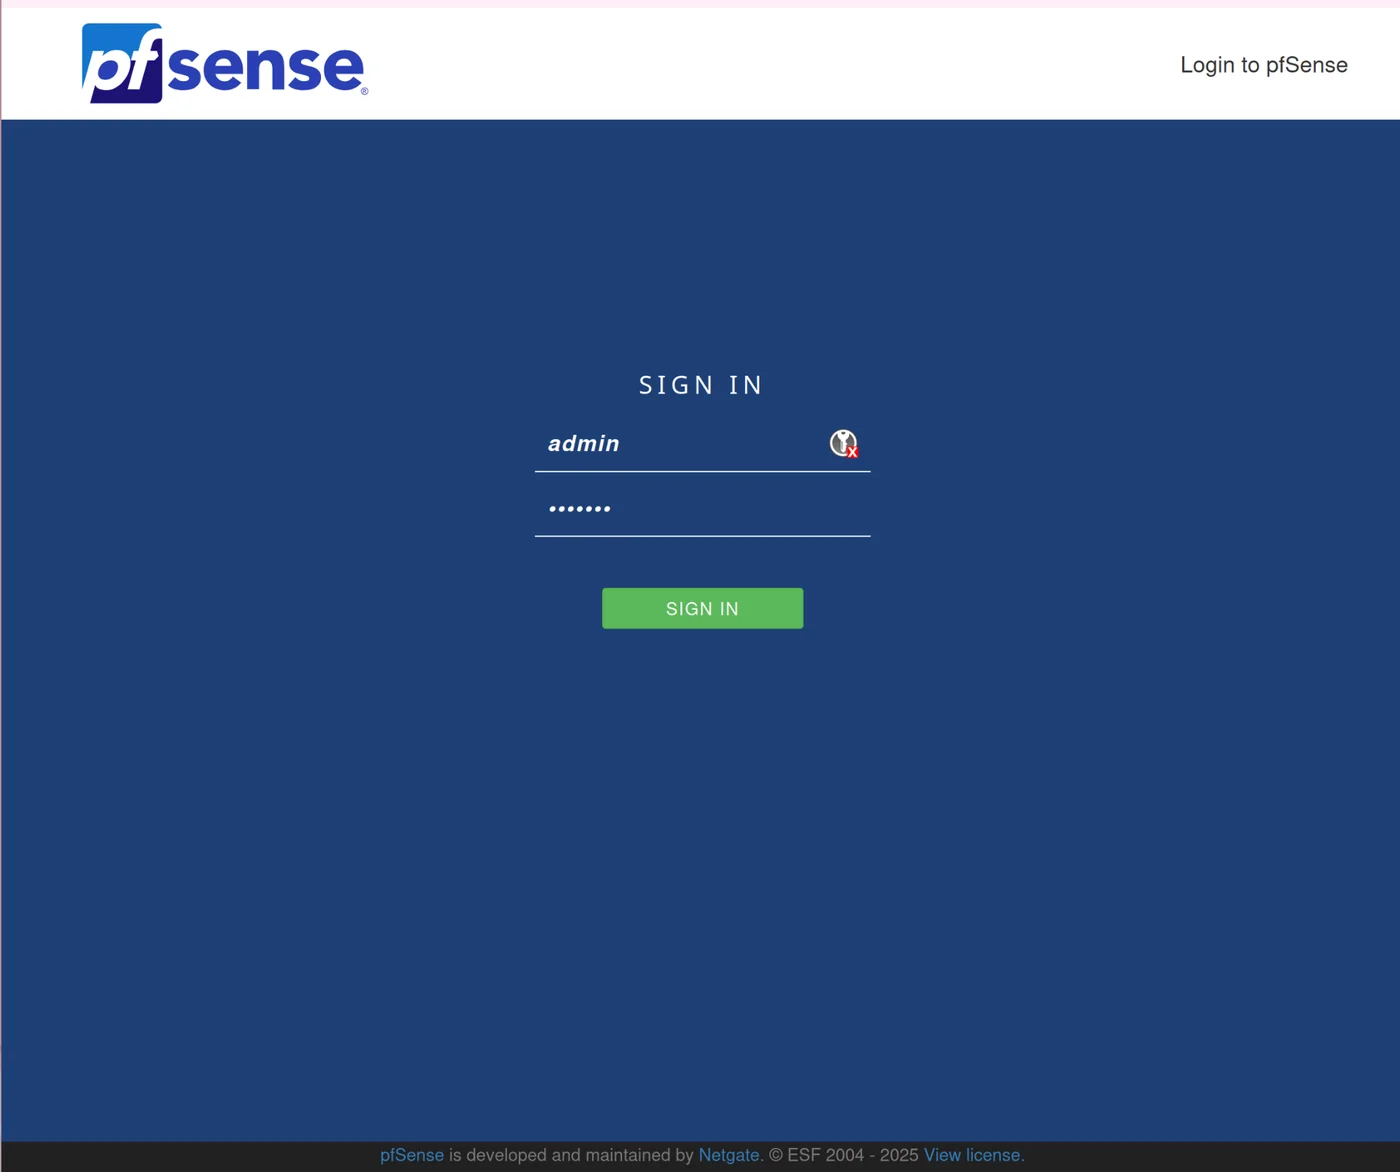
For the pfSense login, use:
- username: admin
- password: pfsense
Now follow the pfSense configuration wizard

- The WAN interface configuration should match what you already entered, leave it as IP Address 10.0.0.2 /30
- Uncheck Block RFC1918 Private Networks but check Block bogon networks
- Leave LAN as 192.168.1.2/24
- Change the admin password
- Click reload to save the configurations
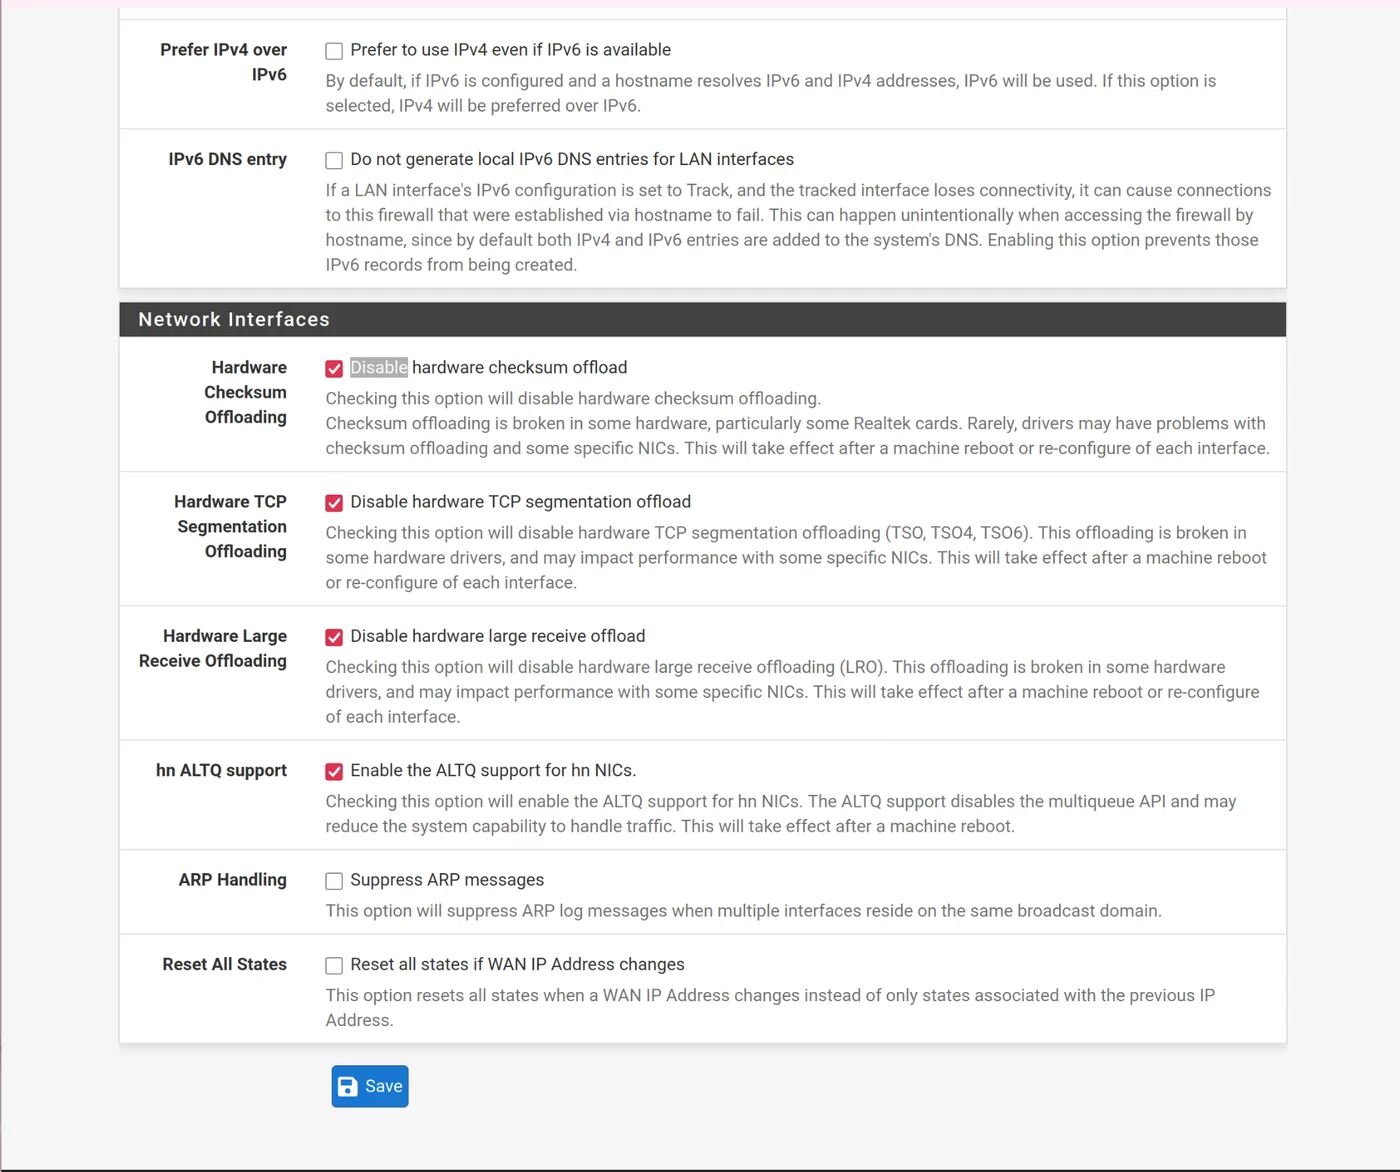
Go to system > advanced > networking: click to disable hardware checksum offloading, note that the system must be rebooted to change this setting
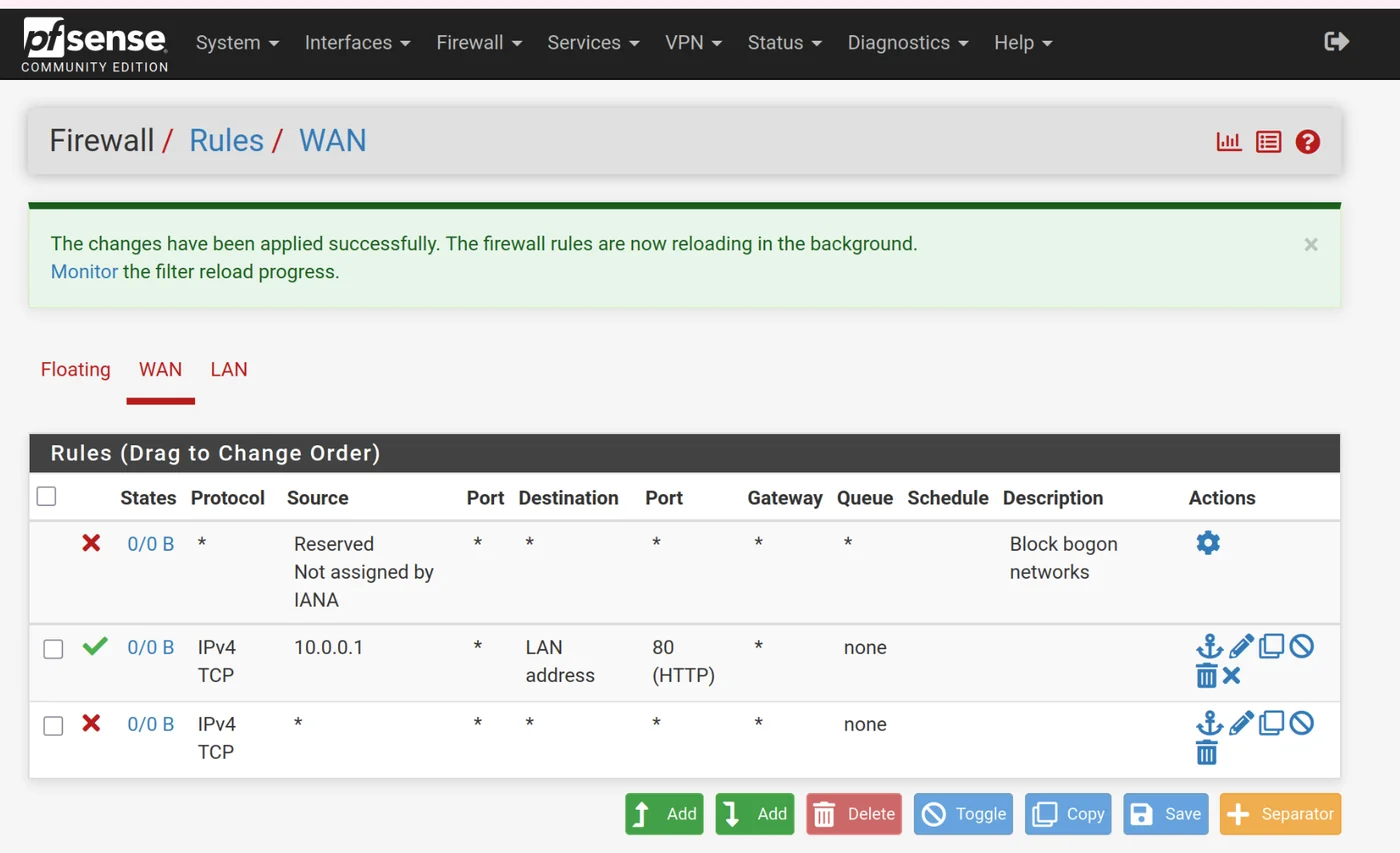
Firewall
I followed all of Mayfly's firewall rules here.
Firewall -> Rules -> WAN
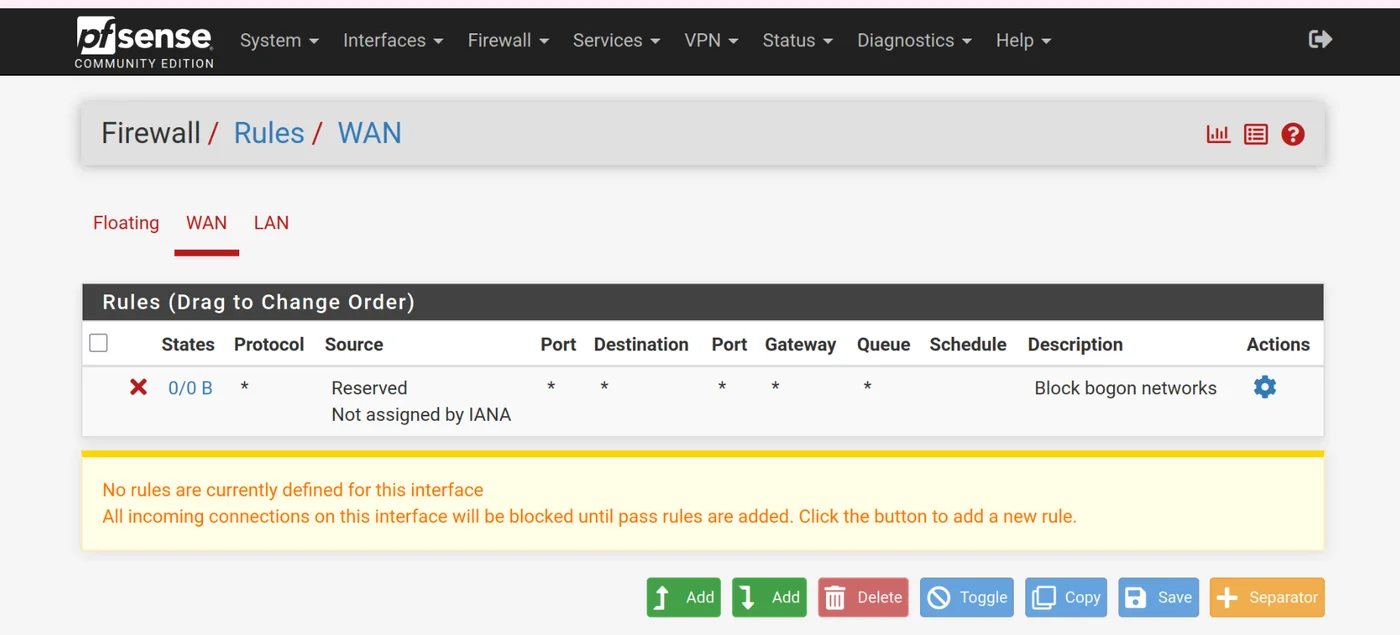
Allow IPv4 TCP traffic from 10.0.0.1 to LAN address port 80 to give access to the pfsense GUI.
Modify iptables rules on the ssh connection to proxmox
I had some issues with this part, if in the future your proxmox doesn't route packets correctly, try deleting the rules and re-running these commands
Run ssh goadproxmox to connect to proxmox and run the following commands:
echo 1 | sudo tee /proc/sys/net/ipv4/ip_forward
iptables -t nat -A PREROUTING -i vmbr0 -p icmp -j ACCEPT
iptables -t nat -A PREROUTING -i vmbr0 -p tcp --dport 22 -j ACCEPT
iptables -t nat -A PREROUTING -i vmbr0 -p tcp --dport 8006 -j ACCEPT
iptables -t nat -A PREROUTING -i vmbr0 -j DNAT --to 10.0.0.2
iptables -t nat -A POSTROUTING -o vmbr0 -j SNAT -s 10.0.0.0/30 --to-source MYPUBLICIP_HERE
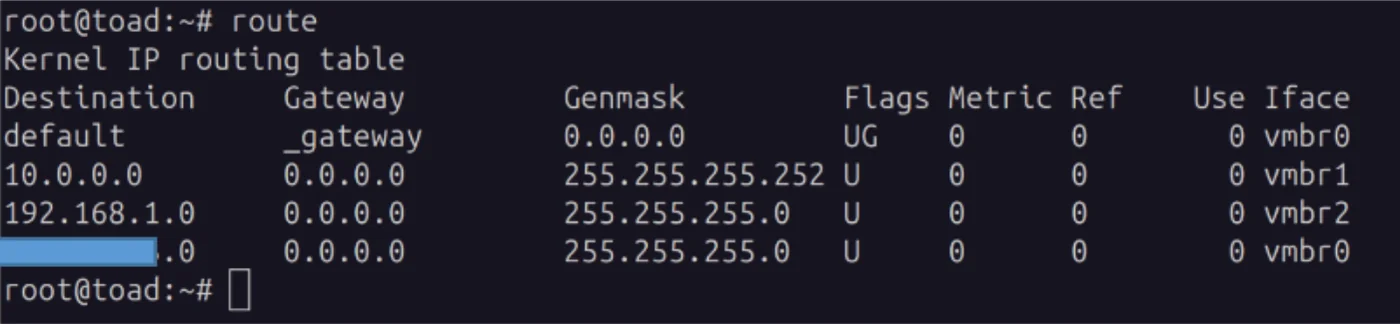
I recommend running 'apt-install net-tools' to check if the routes are correct as shown in the following photo:
apt install net-tools
route
Then save the iptables rules:
iptables-save | sudo tee /etc/network/save-iptables
To make this configuration permanent, the following line can be added to the /etc/network/interfaces file:
post-up iptables-restore < /etc/network/save-iptables
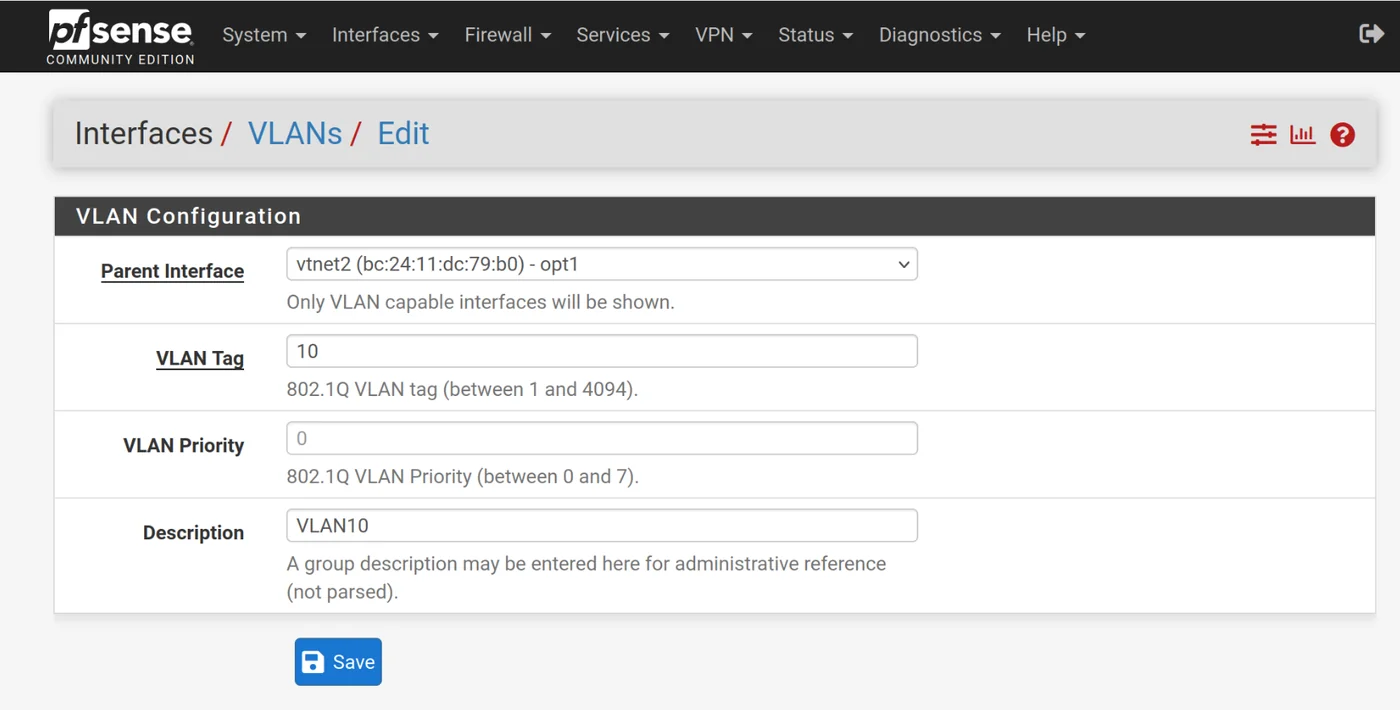
We will now add the two VLANs, go to Interfaces -> VLANs -> Add:
VLAN10:
- Parent Interface = opt1
- VLAN tag 10
- Description: VLAN10
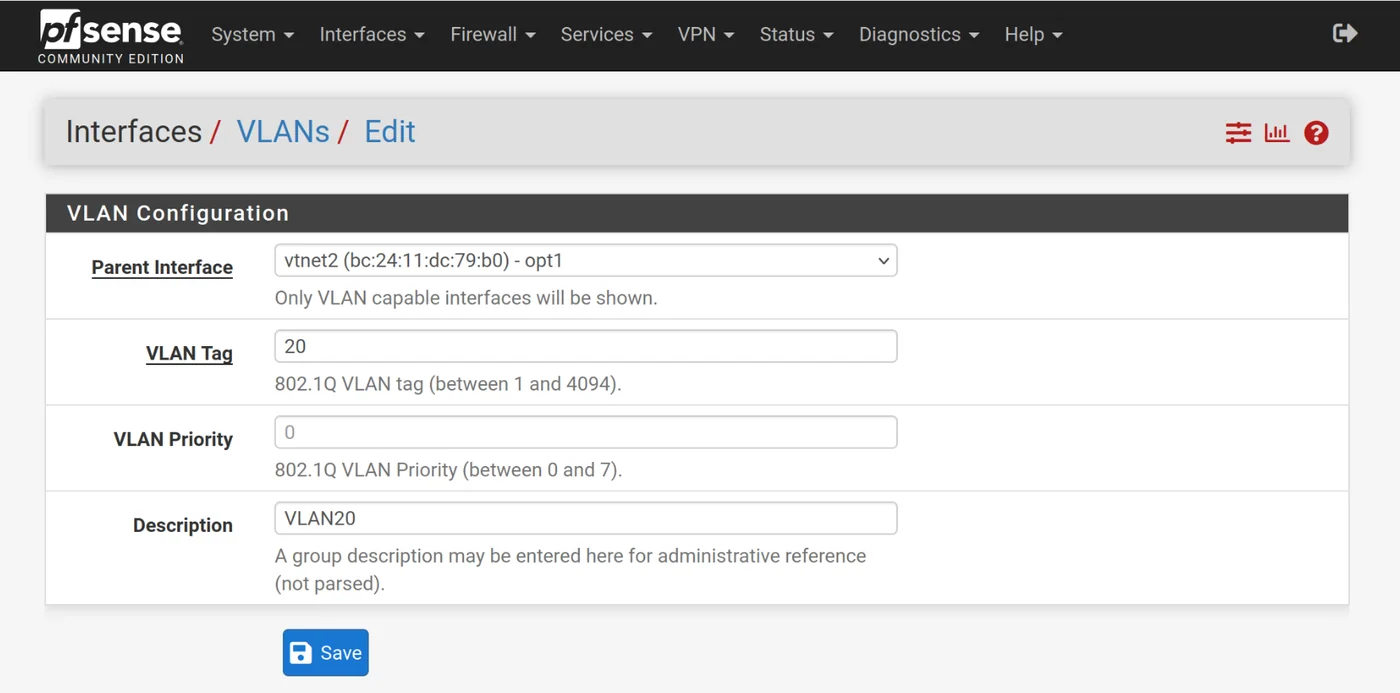
VLAN20:
- Parent Interface = opt1
- VLAN tag 20
- Description: VLAN20
Go to Interfaces -> Interface Assignments and add VLAN10 and VLAN20 to available network ports.
OPT2:
Edit OPT2(vtnet2.10) by clicking on Interfaces > OPT2(vtnet2.10)
- Description: VLAN10
- Select enable interface
- IPv4 configuration type = static IPv4
- IPv4 address = 192.168.10.1/24
- Block bogon networks

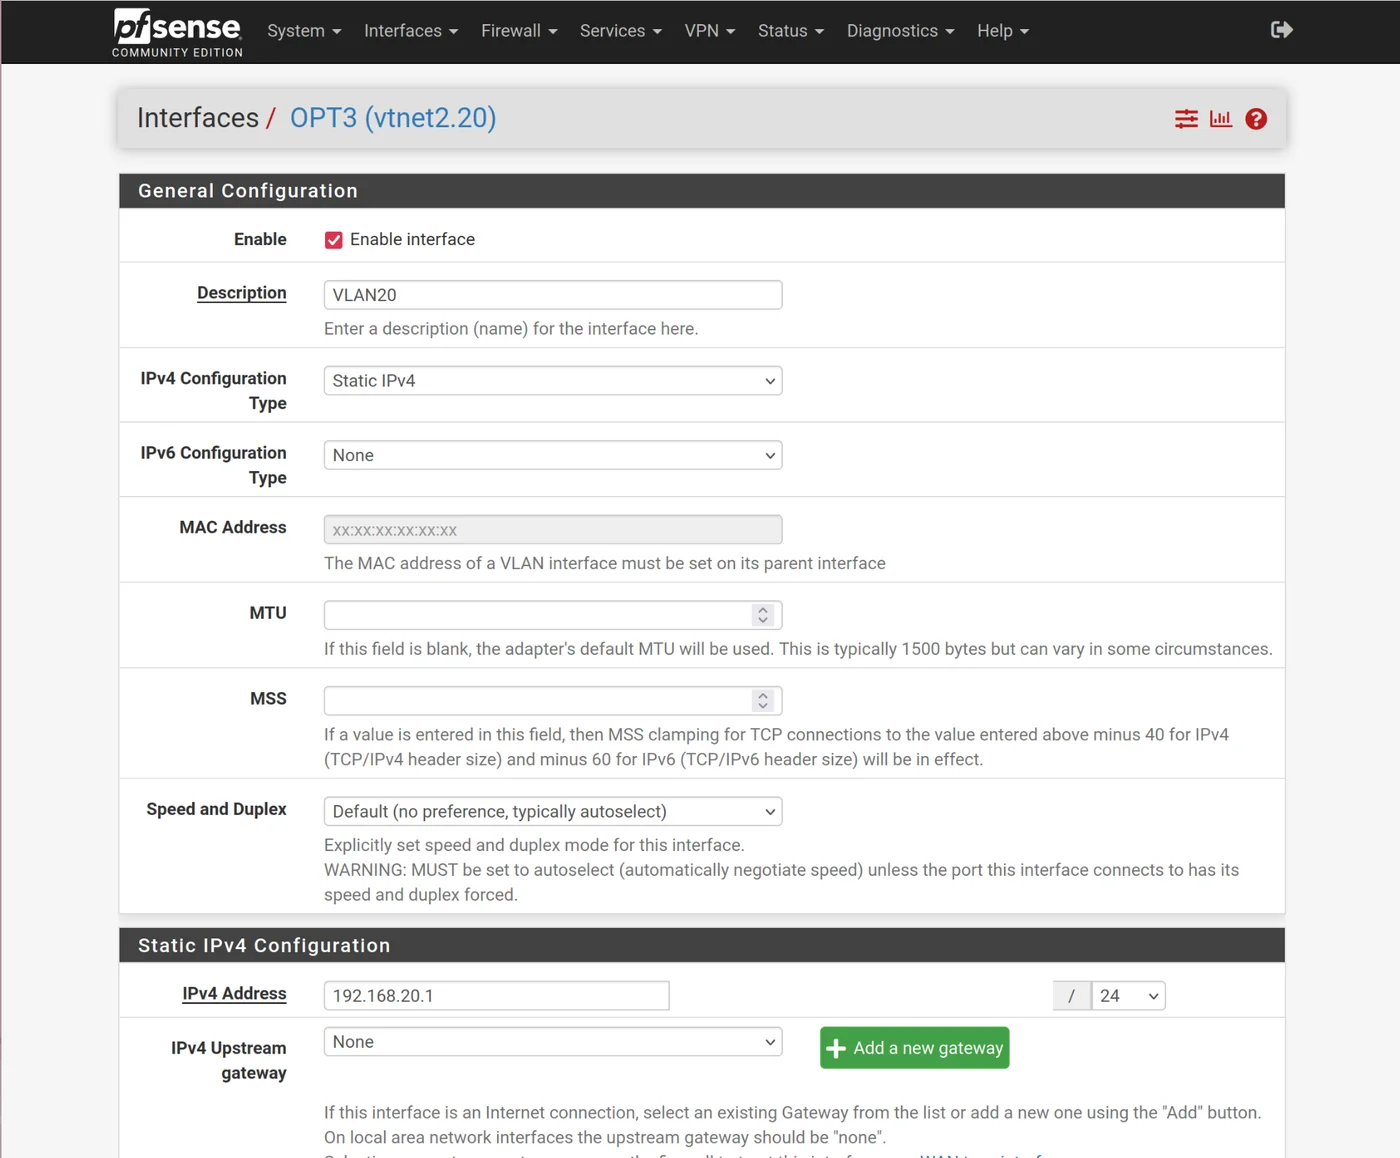
OPT3:
Edit OPT3(vtnet2.20)
- Description: VLAN20
- Select enable interface
- IPv4 configuration type = static IPv4
- IPv4 address = 192.168.20.1/24
- Block bogon networks
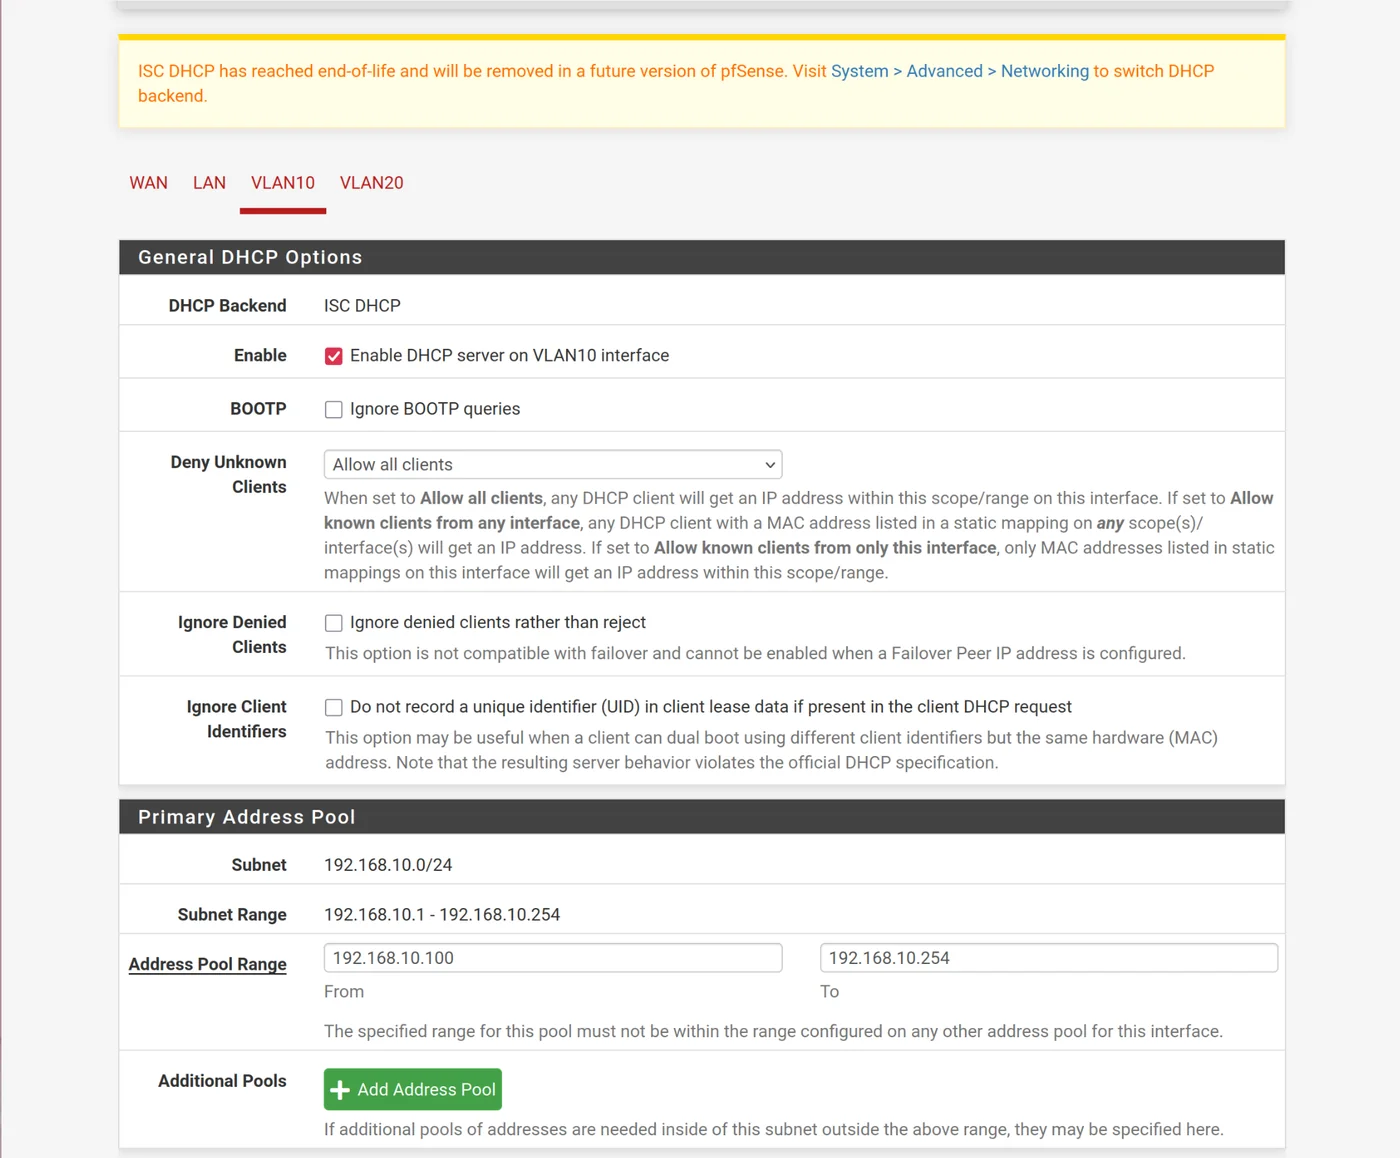
Add DHCP to VLANs
For GOAD, several IP addresses are reserved and static so we start the dhcp server at IP address 192.168.10.100-192.168.10.254
- Services -> DHCP server -> VLAN10
- Enable DHCP server on VLAN10 Interface
- Address range: 192.168.10.100 to 192.168.10.254
- Do the same for VLAN20 with: 192.168.20.100 to 192.168.20.254
Add the Firewall
*note: in mayfly's tutorial, he uses LAN NET which doesn't exist in this version - use LAN subnet instead
- Create an alias: Firewall > Aliases > Edit
- Name: INTERNAL
- Network: 192.168.1.1/16, 10.0.0.1/30, 10.10.10.0/2
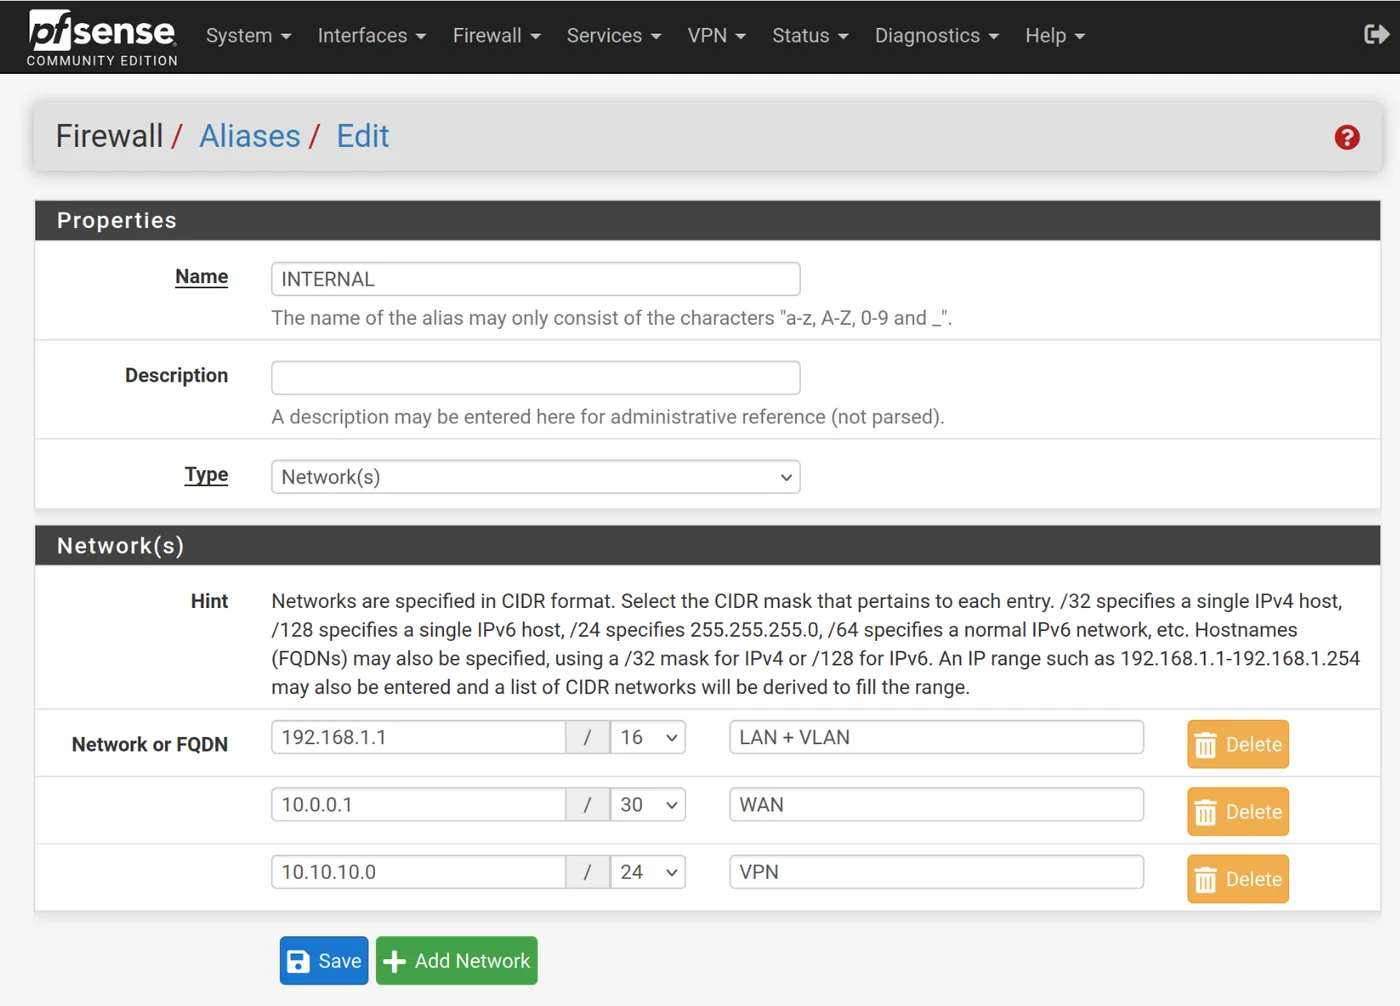
Only allow these networks
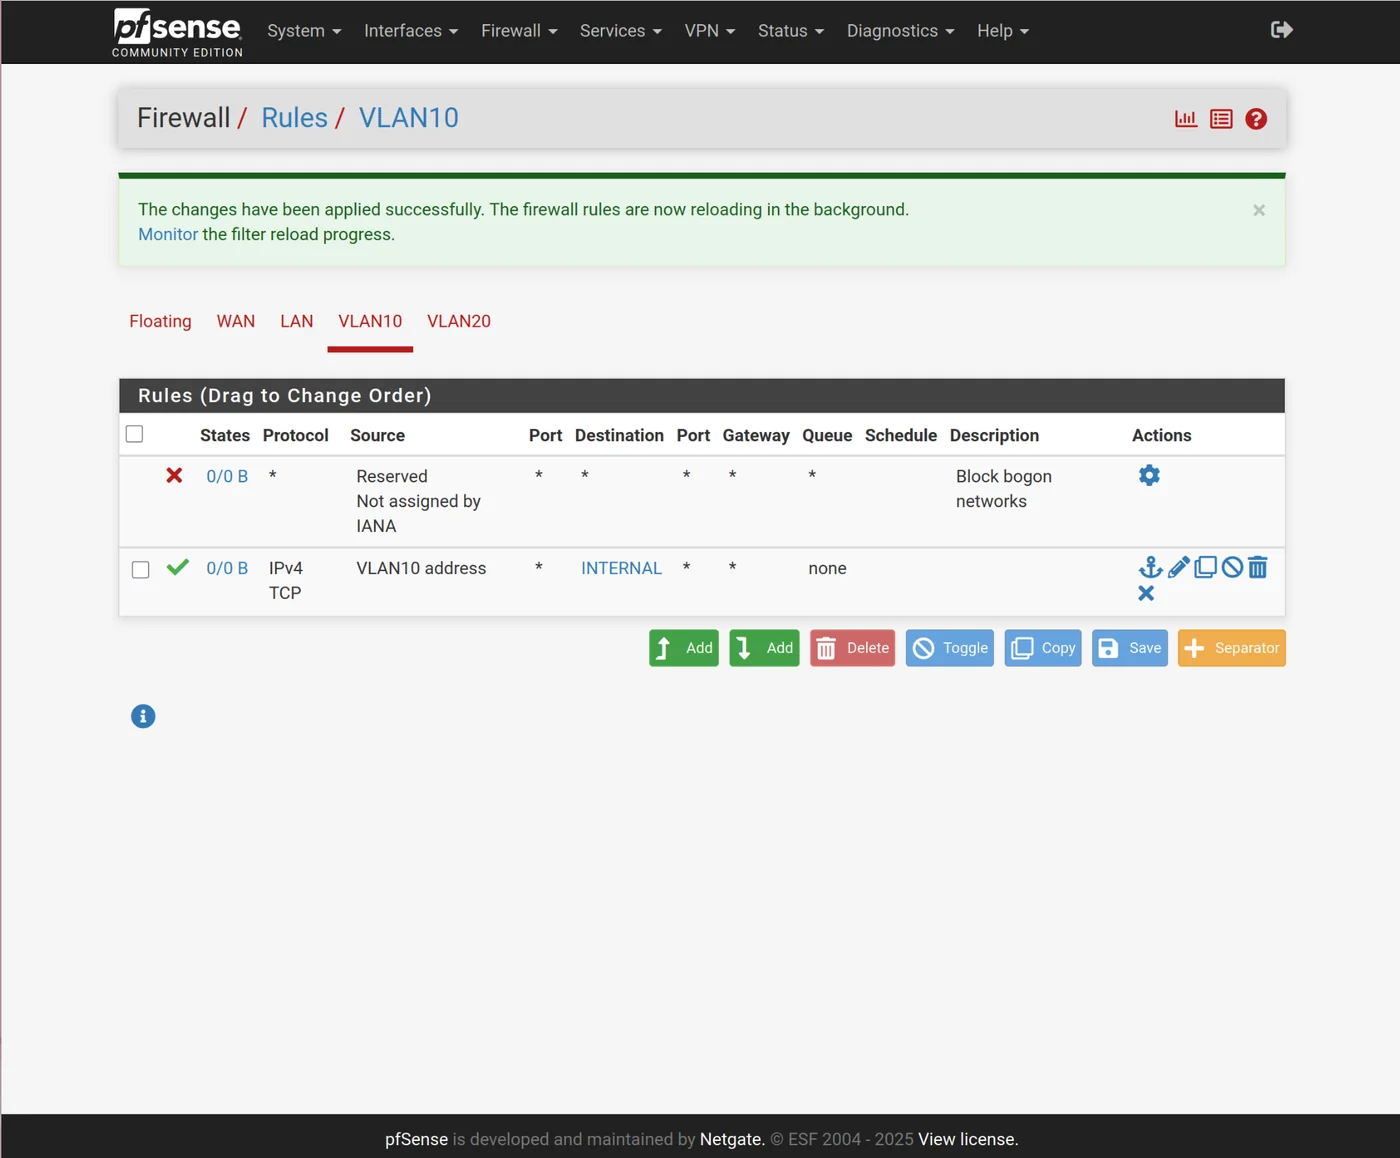
Add a rule to allow ssh to the future provisioning CT
The rest of the article is available here: